The Case List and Case Detail screens on CommCare Mobile allow mobile users to find and view data about a case on their mobile device, even when offline. This page provides an overview of how Case List and Case Detail screens are used, and explains in detail how to configure them.
...
| Table of Contents | ||||||||||||
|---|---|---|---|---|---|---|---|---|---|---|---|---|
|
About Case Lists & Case Details
Case List
...
You can specify the case property columns that are displayed in the case list. Due to the limited screen space on a mobile phone, you typically want to only include two columns. The phones will also let you search over the case properties in the columns - it is sometimes useful to include an ID that the user can quickly type a search term or scan a barcode to find the case they are looking for. The case list can also be sorted and filtered, based on the state of the case.
Case Detail
The case detail screen appears after selecting a case from the case list. It usually includes more information than the case list and is helpful for checking if the user has selected the correct case and providing additional information. For example, the case list may just contain the mother's name - but the case detail will include the husband's name to help users check if they've selected the right mother. To prevent the need for scrolling the case detail screen, important properties should be listed at the top.
...
Case List & Case Detail Configuration
The case list and case detail are configured at the menu level. Click on the name of the menu for which you want to configure the list and detail screens.
...
Each is configured on its own tab:
...
Case List Configuration
On the Case List tab you can configure several different things:
Properties to Display - select the properties you want to display in the list
Filters - write an expression which restricts the cases that are seen in the list
Sorting - allows for multi-level sorting of the list
Parent Child Selection - forces the user to first select the parent case before a child case
You can see each of these options in the example below:
...
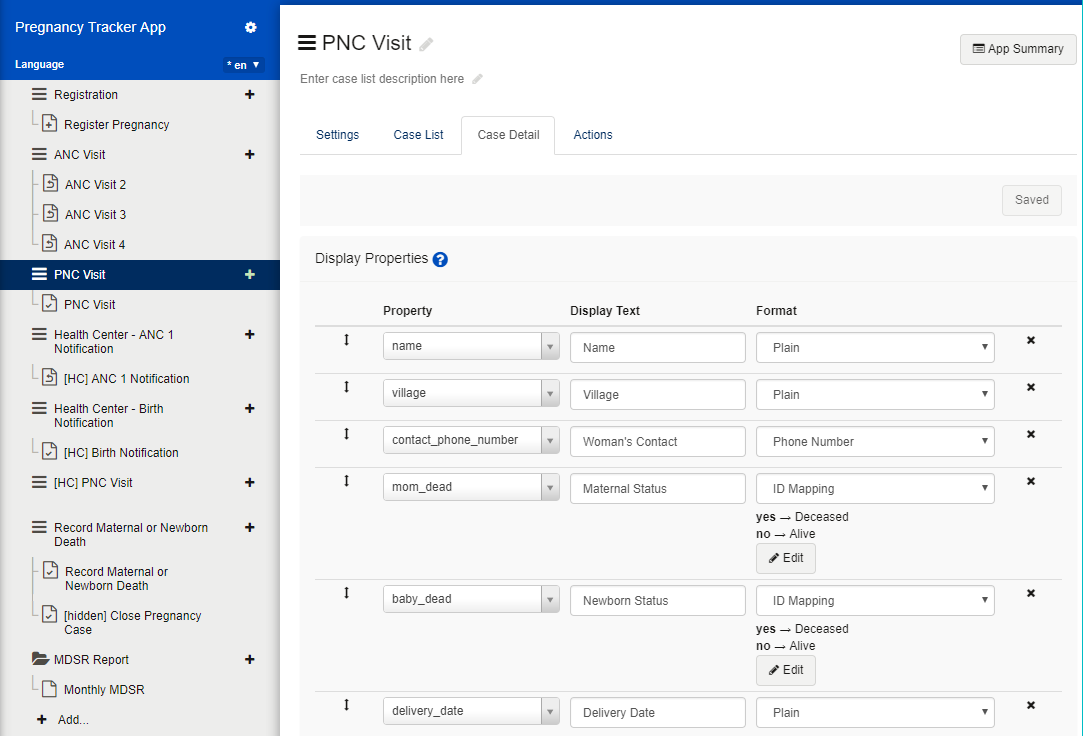
Display Properties
In the top section you can select the case properties that will be displayed in the list. We recommend you think about the size of your screen when choosing how many properties to include. For example, a java phone can only fit about 2 properties, while a tablet may be able to fit 3 or 4.
Add a property
select between a default property or calculated property. Simply start typing in the name of the property and it will automatically populate allowing you to select one from the dropdown.
Add Display Text
This is the text that the user will see. Note that if your app is in multiple languages, you will need to save your text, and then change your view to the next language in order to type in the display text for other languages.
Select a Format
by default all of your properties will be "plain" which has no special formatting. There are many other options which can be useful:
Plain
The case property will be displayed as plain text.
Date
The case property will be formatted as a date. You may select one of several options for formatting the date (for example, DD/MM/YYYY).
Time Since or Until
This is a way of referencing a date but showing time until that date, or time since that date. Possible units of time ("measured as") include years, months, or days. The time since/until will be truncated and not rounded; for example if 1 month and 3 weeks have passed, that would show up as 1 month on the device, not 2 months.
Phone Number
CommCare will provide functionality to call or send an SMS to the number stored in the case property.
ID Mapping
This will allow you to provide a friendly or localized label for a value stored in the case property. For example, if you have a 'state' case property for a pregnant mother that stores 'pregnant', 'not_pregnant' or 'delivered', you may want to display 'Pregnant', 'Not Pregnant' and 'Delivered' in the case list or detail.
Late Flag
If the specified case property is more than the specified number of dates in the past (i.e. it is late), then it will be flagged i.e. it will show up as a '*' in a narrow column in the case list view (and as a '*' in the case details view). If the case property is less With the case list, you can:
Show properties that will help user find the case they want
Add sorts(Case List Sorting) and hidden properties to help user search for the item they want.
It is possible to have several case properties displayed in the case list, but should consider the device type you are using. Phones have smaller screen sizes, and therefore will be able to display fewer properties in the case list, whereas tablets have a more space on the screen to show more properties. In general, 3 to 4 properties is a good number to display in the case list.
Case Detail
...
The case detail screen appears after selecting a case from the case list. It usually includes more information than the case list and is helpful for checking if the user has selected the correct case and providing additional information. For example, the case list may just contain the mother's name - but the case detail will include the husband's name to help users check if they've selected the right mother. To prevent the need for scrolling the case detail screen, important properties should be listed at the top.
With the case details, you can:
Can show more properties thancase list.
Add properties that will help user make sure they've picked the right case
Add properties that will help user before opening a form for the case
Use the Format option to display case properties correctly for the user. See Case List and Case Detail Configuration.
Use ID Mapping if displaying any case properties that store item values. This will make sure friendly text is shown.
Case List & Case Detail Configuration
The case list and case detail are configured at the menu level. Click on the name of the menu for which you want to configure the list and detail screens.
...
Each is configured on its own tab:
...
Case List Configuration
On the Case List tab you can configure several different things:
Properties to Display - select the properties you want to display in the list
Filters - write an expression which restricts the cases that are seen in the list
Sorting - allows for multi-level sorting of the list
Parent Child Selection - forces the user to first select the parent case before a child case
You can see each of these options in the example below:
...
Display Properties
In the top section you can select the case properties that will be displayed in the list. We recommend you think about the size of your screen when choosing how many properties to include. For example, a java phone can only fit about 2 properties, while a tablet may be able to fit 3 or 4.
Add a property
select between a default property or calculated property. Simply start typing in the name of the property and it will automatically populate allowing you to select one from the dropdown.
Add Display Text
This is the text that the user will see. Note that if your app is in multiple languages, you will need to save your text, and then change your view to the next language in order to type in the display text for other languages.
Select a Format
by default all of your properties will be "plain" which has no special formatting. There are many other options which can be useful:
Plain
The case property will be displayed as plain text.
Date
The case property will be formatted as a date. You may select one of several options for formatting the date (for example, DD/MM/YYYY).
Time Since or Until
This is a way of referencing a date but showing time until that date, or time since that date. Possible units of time ("measured as") include years, months, or days. The time since/until will be truncated and not rounded; for example if 1 month and 3 weeks have passed, that would show up as 1 month on the device, not 2 months.
Phone Number
CommCare will provide functionality to call or send an SMS to the number stored in the case property.
ID Mapping
This will allow you to provide a friendly or localized label for a value stored in the case property. For example, if you have a 'state' case property for a pregnant mother that stores 'pregnant', 'not_pregnant' or 'delivered', you may want to display 'Pregnant', 'Not Pregnant' and 'Delivered' in the case list or detail.
Late Flag
If the specified case property is more than the specified number of dates in the past or it is in the future (i.e. it is not late), then it will be flagged i.e. it will show up as blank a '*' in a narrow column in the case list view (and as a '*' in the case details view). If the case property is less than the specified number of dates in the past or it is in the future (i.e. it is not late), then it will show up as blank in the case list view and it will not show up at all in the case details view. If the specified case property is null/uninitialized, it will be treated as though it is late. If the late flag is the first column in the case list view, then the not late (un-'*'-ed) cases will all be displayed, followed by the late ('*'-ed) cases.
...
You can also add a sort property from a calculated property. Simply define the calculated property in the "Display Properties" section, and select this option in the "Filtering and Sorting" section. The image below provides a brief demonstration of how you would set this up.
...
...
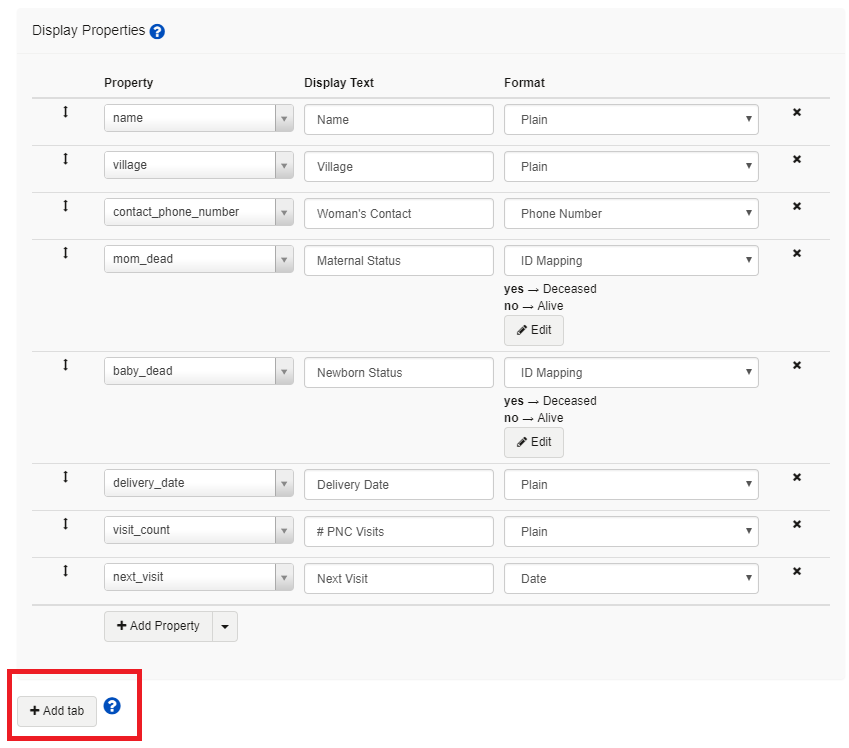
The case detail configuration allows you to specify which case properties your users will see after having selected a case from the case list.
To add a case property click on "Add Property" and follow the directions for Display Properties (above).
You can also organize the Case Detail page using tabs. Please see documentation at https://dimagi.atlassian.net/wiki/x/RRjKfw.
Text Formatting
It is also possible to use advanced text formatting to the case detail page. Formats that can be used and how to use them can be found at Text Formatting (Markdown).
...
Copying Rows from the Case List/Detail
If you want to reuse a property from the case list/detail, or from the case list/details of another screen you can use the copy case list/detail function. For example if you put a really long ID Mapping in the case list, but you also want it in the detail screen, you can now click on the ID Mapping row, Ctrl-C, navigate to the detail screen tab, click on the row below which you want to insert it, and Ctrl-V. To insert at the beginning, click on the header. User sees the built in "selected" browser indication when clicking on a row; you can hit tab to select the next row, shift+tab to select the previous. In ID Mappings in particular translations in multiple languages are maintained. You can see a demonstration here.
Calculations in the Case List/Detail
...
Tip: Displaying History of Changes in Case List
In the case list screen it is often useful to display the history of a tracked value like patient weight or blood pressure.
| Expand | ||
|---|---|---|
| ||
This can be done by following the incrementing a counter trick, but using a string concatenation instead of an increment:
In the calculate condition for "new_weight_history", you use the concat function to add the answer to the weight question to the weight_history: Example Icon The output of this would be "55 - 56 - 58 - " and would continue to track the additions.  |
Case Detail Configuration
The case detail configuration allows you to specify which case properties your users will see after having selected a case from the case list.
To add a case property click on "Add Property" and follow the directions for Display Properties (above).
You can also organize the Case Detail page using tabs. Please see documentation at https://dimagi.atlassian.net/wiki/x/kgXKfw.
Localization (Translations in the Case Details/List)
If your application contains multiple languages, you can define different Display Text for each language. Select the language drop down in the top-left corner of the application builder and choose the language you want to update. Update the Display Text for each property in the case list.
You can also update the translations for questions with ID mapping - this is particularly important for multiple choice questions where the choice value will only be in one language. For example, to establish Hindi translations for the choice values, change the language of the application builder to Hindi and navigate to the Case List tab for your menu. Select the property with the ID Mapping format you would like to translate, then click Edit and add Key -> Value mappings (choice value -> translation) for each of the possible choice values for that question.
Here is an example of editing the Display Text for a property
...
And the view of editing the ID Mapping:
...
If you are using ID mapping for the same question in multiple menus you can use the copy function described above.
Case List & Case Detail Tips & Tricks
Referencing the username in the case list or details
It is occasionally useful to display the username who generated a case in the case list.
One example is: a nurse can receive referrals from multiple community health workers (CHWs). It would be useful for this nurse to know which CHW sent a particular referral case. Here is how to display the username:
In the form that acts upon (creates or updates) the case in question, add a hidden value in the form builder. You may call this hidden value whatever is appropriate.
In the calculate condition, paste the following: /data/meta/username
Save this hidden value to your case in the case management section
You may now add this case property to your case list or case details. It will display the username for the user who submitted the form for the case.
Minimize Duplicates Method 1: Registration From the Case List
Minimize data errors and duplicate case entries by setting up Register From Case List in your CommCare application.
This feature is intended to make registration forms directly accessible from a case list. Without this feature, if you want to verify that a case was not previously registered you have to look in the case list first, and if you don't find it, leave and navigate to the appropriate registration form.
With this feature turned on a mobile worker will be presented with an option to jump directly to the registration form if they can't find the case in the case list.
...
You can read more below. RRjKfw.
Text Formatting
It is also possible to use advanced text formatting to the case detail page. Formats that can be used and how to use them can be found at Text Formatting (Markdown).
...
Copying Rows from the Case List/Detail
If you want to reuse a property from the case list/detail, or from the case list/details of another screen you can use the copy case list/detail function. For example if you put a really long ID Mapping in the case list, but you also want it in the detail screen, you can now click on the ID Mapping row, Ctrl-C, navigate to the detail screen tab, click on the row below which you want to insert it, and Ctrl-V. To insert at the beginning, click on the header. User sees the built in "selected" browser indication when clicking on a row; you can hit tab to select the next row, shift+tab to select the previous. In ID Mappings in particular translations in multiple languages are maintained. You can see a demonstration here.
Calculations in the Case List/Detail
It is also possible to use calculations in the case list/details screen by enabling an Add-Ons via the application settings screen. This feature will allow you to use custom xpath expressions to perform calculations on data and case properties that can be displayed to your mobile workers. For more information on how to enable and use this functionality, please see https://dimagi.atlassian.net/wiki/x/kgXKfw.
Localization (Translations in the Case Details/List)
If your application contains multiple languages, you can define different Display Text for each language. Select the language drop down in the top-left corner of the application builder and choose the language you want to update. Update the Display Text for each property in the case list.
You can also update the translations for questions with ID mapping - this is particularly important for multiple choice questions where the choice value will only be in one language. For example, to establish Hindi translations for the choice values, change the language of the application builder to Hindi and navigate to the Case List tab for your menu. Select the property with the ID Mapping format you would like to translate, then click Edit and add Key -> Value mappings (choice value -> translation) for each of the possible choice values for that question.
Here is an example of editing the Display Text for a property
...
And the view of editing the ID Mapping:
...
If you are using ID mapping for the same question in multiple menus you can use the copy function described above.
Add Tabs on Case Detail Screen
The following section will show you to add tabs to your Case Details page. You can use this feature to organize or categorize case properties that are displayed to the user in the case details page.
Learn more below.
...
| Expand | ||
|---|---|---|
|
...
Appearance on CommCare Mobile
When turned on, a link to your selected registration form will always appear in the case list:
...
Even if you enter a search term, the option to jump directly to registration will show up at the bottom of the case list:
...
Configuration on CommCare HQ
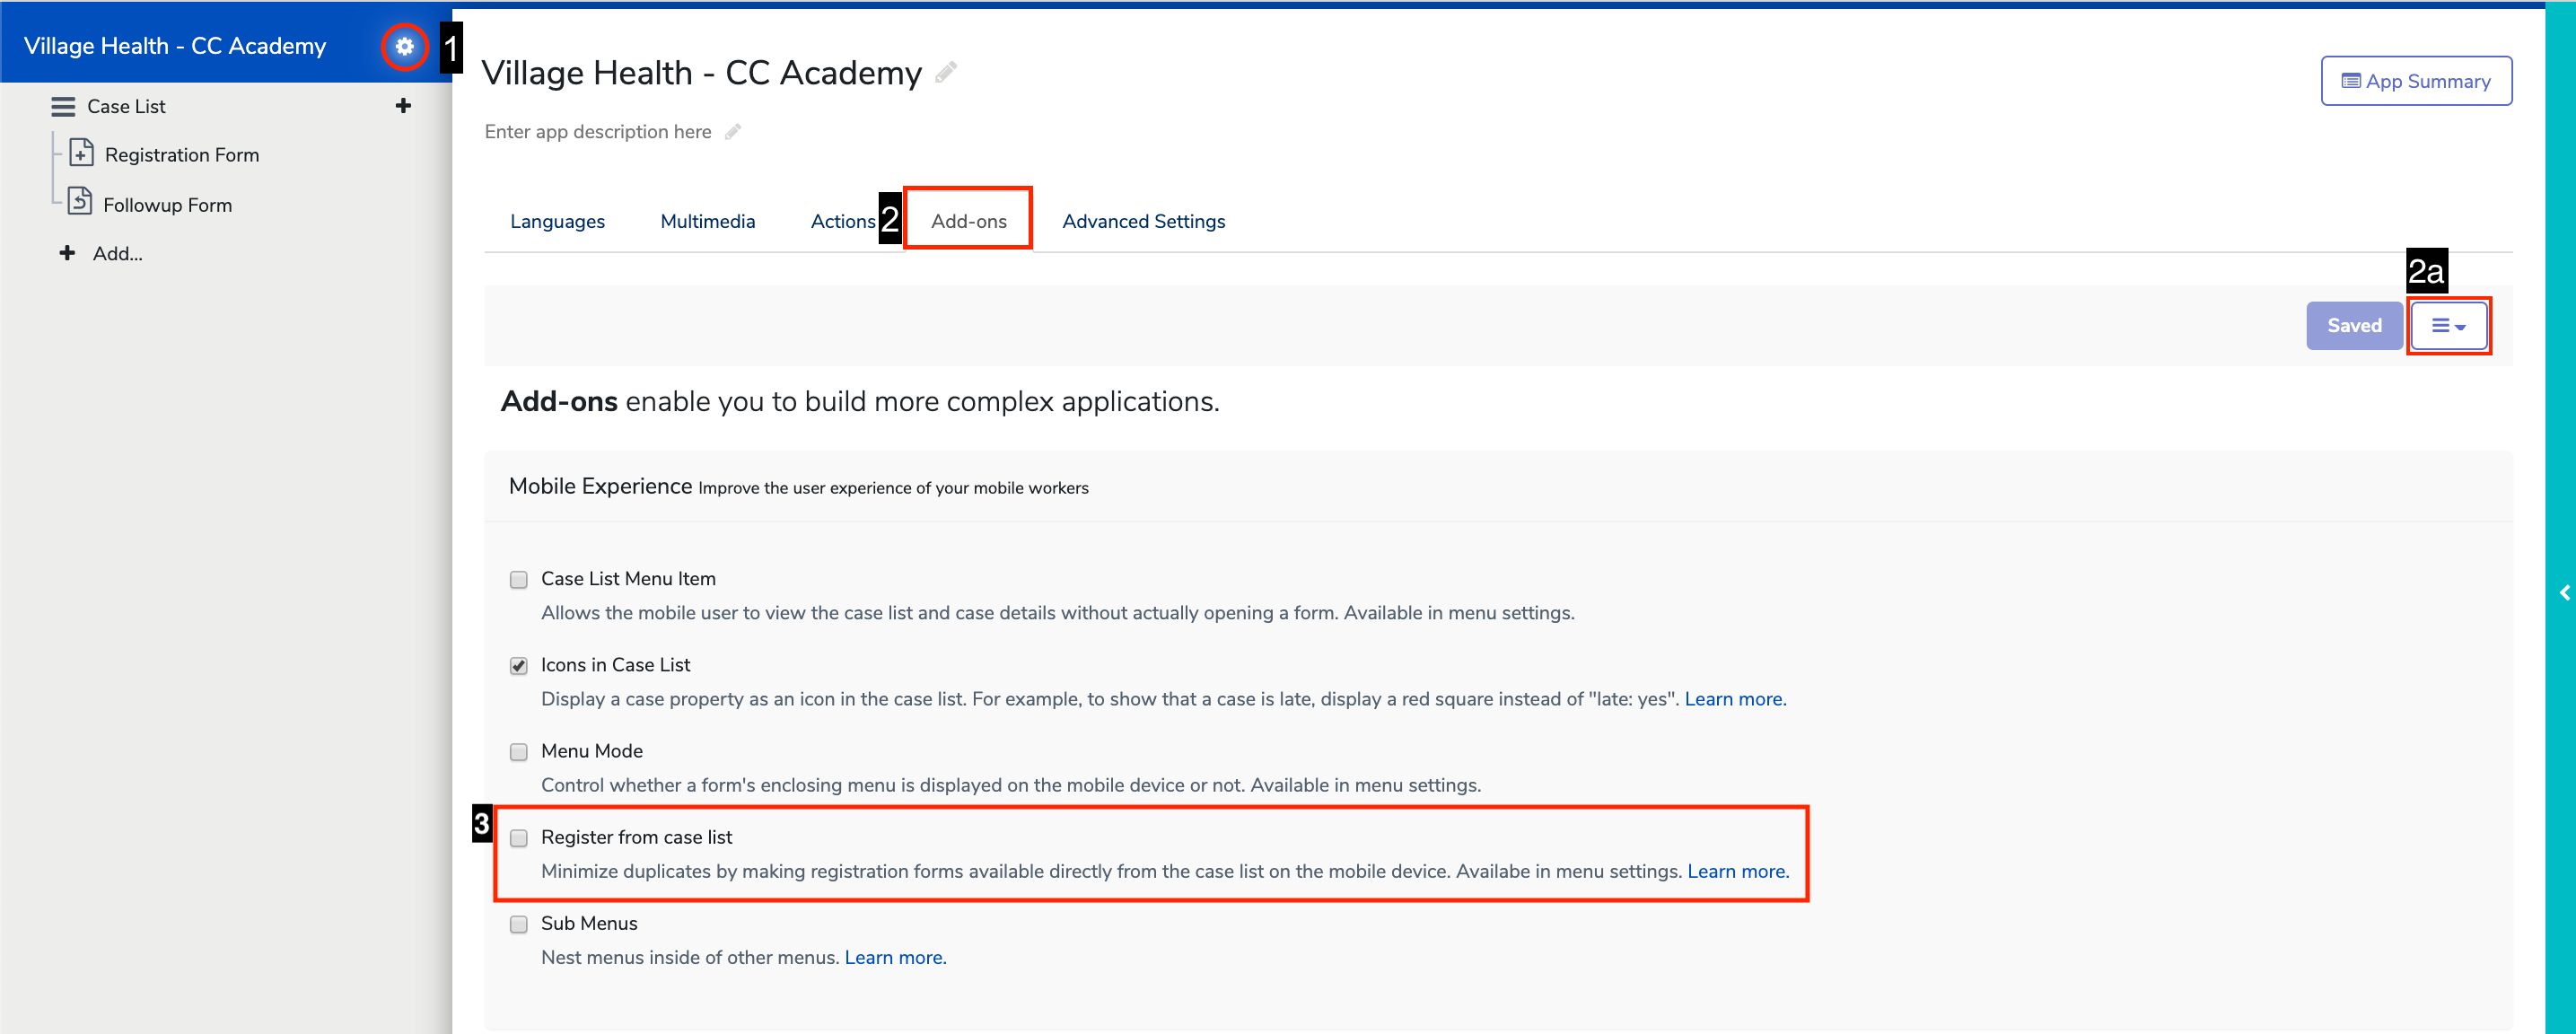
Firstly, enable the "Register from Case List" Add-Ons from the application settings page, if its not yet enabled.
Access the application settings page by clicking on the gear icon on the top-left pane of your application.
On the settings page, select the Add-ons tab, then select the button with three-lines in the upper right hand corner and make sure the Mobile Experience is checked.
Scroll down to the Mobile Experience block and select the Register from case list checkbox and hit save.
...
Choose the menu you want to configure.
...
From the Registration Form Accessible from Case List dropdown, select the relevant registration form.
Note: The form can be in any other menu in the same application, as long as it is the same case type. The form cannot be in the same menu as the menu that you are configuring with Registration from Case List.
Example app setup with register from case list:
...
"Register new CCFLS case" is the form that is accessible from the case list of "CCFLS register". The menu filter on "Register CCFLS" is set to "false()" so that registration is only possible through the case list. The settings are set up in the case management tab of "CCFLS register".
Change the label, end of registration action and icon/audio if desired.
...
The label is what will show up on the mobile as the option to jump to the registration form.
Limitations
The minimize duplicates setting cannot be used for menus that have any of the following:
Parent/Child Case Selection turned on.
Menu Mode is configured as "Display menu and then forms"
Minimize duplicates only works only on CommCare version 2.20 or higher
Minimize duplicates will override end of form navigation setup for that form. You should leave it set to * Home Screen and should instead control the end of form action in the Advanced settings as shown on the screenshot above.
SetupTo add tabs to the case detail page, use the following instructions:
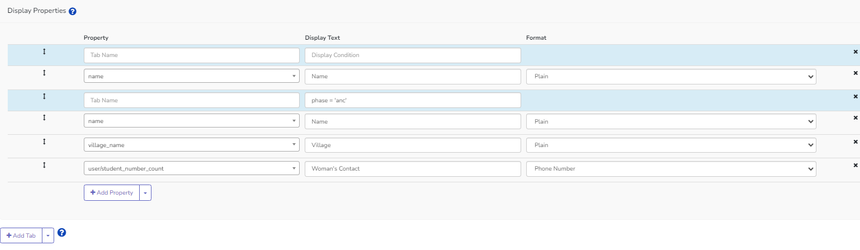
Now when you deploy the application, the case details page will look as follows:  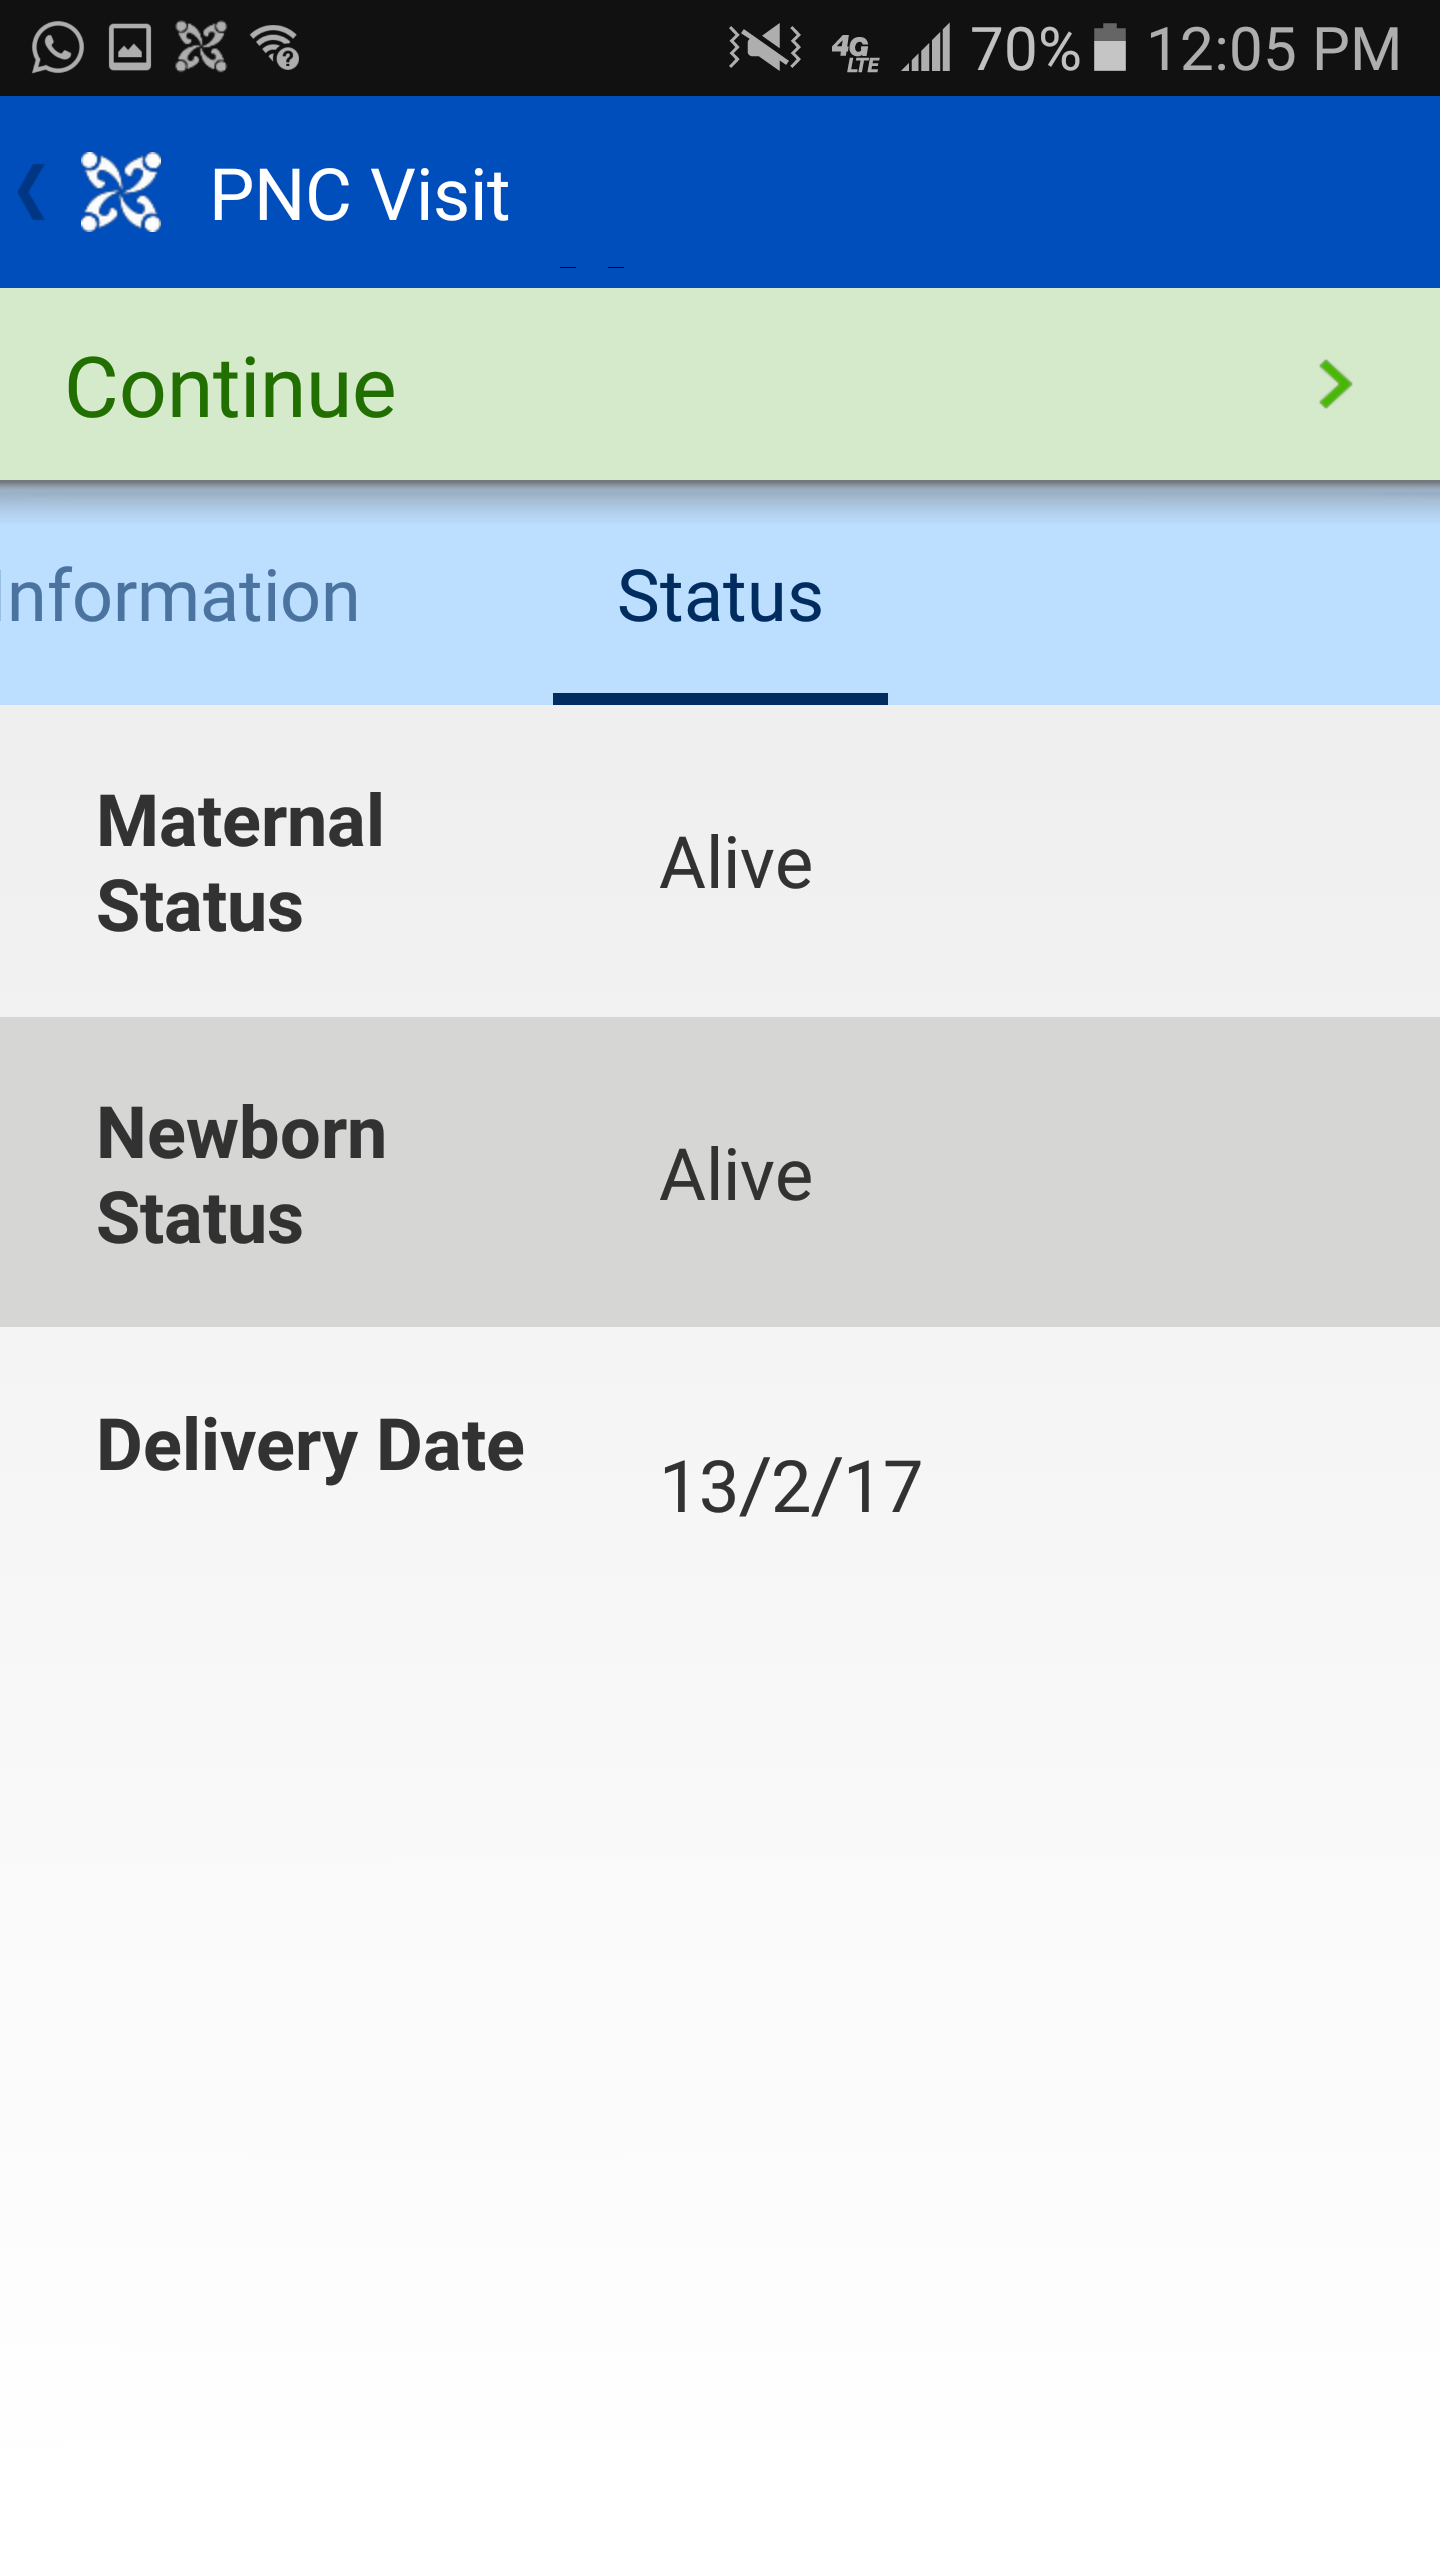 |
Case List & Case Detail Tips & Tricks
Referencing the Username in the Case List or Details
It is occasionally useful to display the username who generated a case in the case list.
One example is: a nurse can receive referrals from multiple community health workers (CHWs). It would be useful for this nurse to know which CHW sent a particular referral case. Here is how to display the username:
In the form that acts upon (creates or updates) the case in question, add a hidden value in the form builder. You may call this hidden value whatever is appropriate.
In the calculate condition, paste the following: /data/meta/username
Save this hidden value to your case in the case management section
You may now add this case property to your case list or case details. It will display the username for the user who submitted the form for the case.
Minimize Duplicates: Registration From the Case List
Minimize data errors and duplicate case entries by setting up validations from a label Register From Case List in your CommCare application. This method utilizes labels, validation conditions, and session instance variables to set up a strict way of preventing users from registering duplicate cases. Please modify the instructions below to fit your specific needs.
Click to expand to learn more.
This feature is intended to make registration forms directly accessible from a case list. Without this feature, if you want to verify that a case was not previously registered you have to look in the case list first, and if you don't find it, leave and navigate to the appropriate registration form.
With this feature turned on a mobile worker will be presented with an option to jump directly to the registration form if they can't find the case in the case list.
...
You can read more below.
| Expand | ||
|---|---|---|
| ||
Configuration Appearance onCommCareHQImagine the following scenario:
If this scenario seems similar to your needs, please follow the instructions below:
label field. a. In the label field, insert a validation condition similar to the following: b. Change each of the bold parts of the expression to match your application
Your label should look something like this: 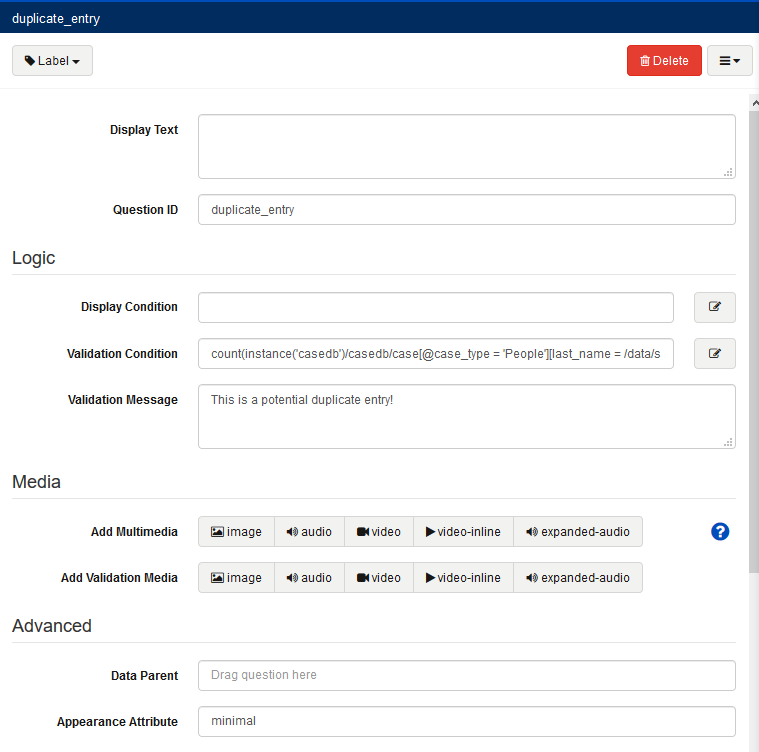 |
Tabs on Case Detail Screen
The following section will show you to add tabs to your Case Details page.Y ou can use this feature to organize or categorize case properties that are displayed to the user in the case details page.
Learn more below.
| Expand | ||
|---|---|---|
| ||
SetupTo add tabs to the case detail page, use the following instructions:
Now when you deploy the application, the case details page will look as follows: |
Calculations in the Case List and Details
In its basic form, the Case list and Case details definition pages only accept case properties of the module case type. However, there is an addon that allows the use of calculations in the case list/details, called Custom Calculations in Case List. In addition to calculations, the Add-Ons also opens the possibilities beyond the module case type, allowing access to any fixture available in the user’s restore file.
Click below to set this up.
...
| title | CLICK TO EXPAND |
|---|
Enabling the Add-on
To turn on this feature, proceed to the Application Settings (1) -> Add-Ons section (2) of the application:
...
Next, select the button with three-lines in the upper right hand corner and choose “Calculations” (3):
...
In the Calculation section, check the option “Custom Calculations in the Case List” Add-Ons (4) and hit save (5) to commit the changes.
...
Using the Feature
Once the Add-Ons has been enabled, a new option will appear in the Add Property dropdown list (1) in the Case List or Case Detail definition pages, selecting Calculated Property (2) will create a new field in which it’s possible to define an XPath expressions to perform calculations (3), including the use of case properties.
...
Writing expressions
Case properties and attributes in Calculated properties are evaluated the same way as Properties in Case List and Details, as long as they are within the scope of the current case being iterated over. For instance, if the selected property is age, Commcare will actually execute “current()/age”. For properties outside the scope, a full XPath query expression is required. See some examples below.
Calculations within the scope
...
Type
...
Description
...
Expression
...
Example
...
Case attributes
...
Displays the ID of the current case
...
current()/@case_id
...
Case indexes
...
Displays the ID of the parent case of the current case
...
current()/index/parent
...
Case properties
...
Displays the value of the property
...
current()/age
...
Mathematical Calculation
...
Returns the estimated Date of birth according to the Age stored in the case
...
date(floor(today() - (current()/age * 365.25)))
...
Calculations beyond the scope
...
Type
...
Description
...
Expression
...
Example
...
Calculation involving the parent case
...
Displays the name of the Parent case
...
instance('casedb')/casedb/case[@case_id=current()/index/parent]/case_name
...
Calculation involving child cases
...
Returns the number of child cases
...
count(instance('casedb')/casedb/case[@case_type='member'][index/parent=current()/@case_id])
...
Calculation involving User properties
...
Checks whether the User is assigned to the same location as the patient
...
if(instance('commcaresession')/session/user/data/commcare_location_id=village_id,"YES","NO")
...
Calculation involving Locations
...
Retrieves a location's name based on information stored in the case
...
instance('locations')/locations/location[@id=current()/village_id]/name
...
Calculation involving Lookup tables
...
Retrieves a field of a Lookup table item based on information stored in the case
...
instance('item-list:medicine')/medicine_list/medicine[index=current()/medication_index]/medication
...
Overwriting Case List and Case Detail Configuration
For applications that have many similar menus, it can be useful to copy one menu's entire case list or case details configuration to another menu.
This feature is behind an application Add-Ons . Click below to learn more.
| Expand | ||
|---|---|---|
| ||
To turn it on, visit your application's Settings page by clicking the gear next to the application's name:  And then click the Add-Ons tab:  This feature is an efficiency Add-Ons 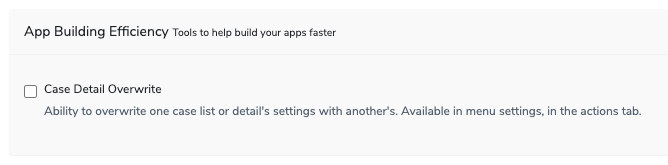 Using the Feature Caution: This action is irreversible. It is strongly recommended that you make a new version of your application before trying out this feature. In the event of an error, you can revert back to that version. Once the feature is enabled, visit the menu that you wish to copy and select the Actions tab to see the overwrite options. 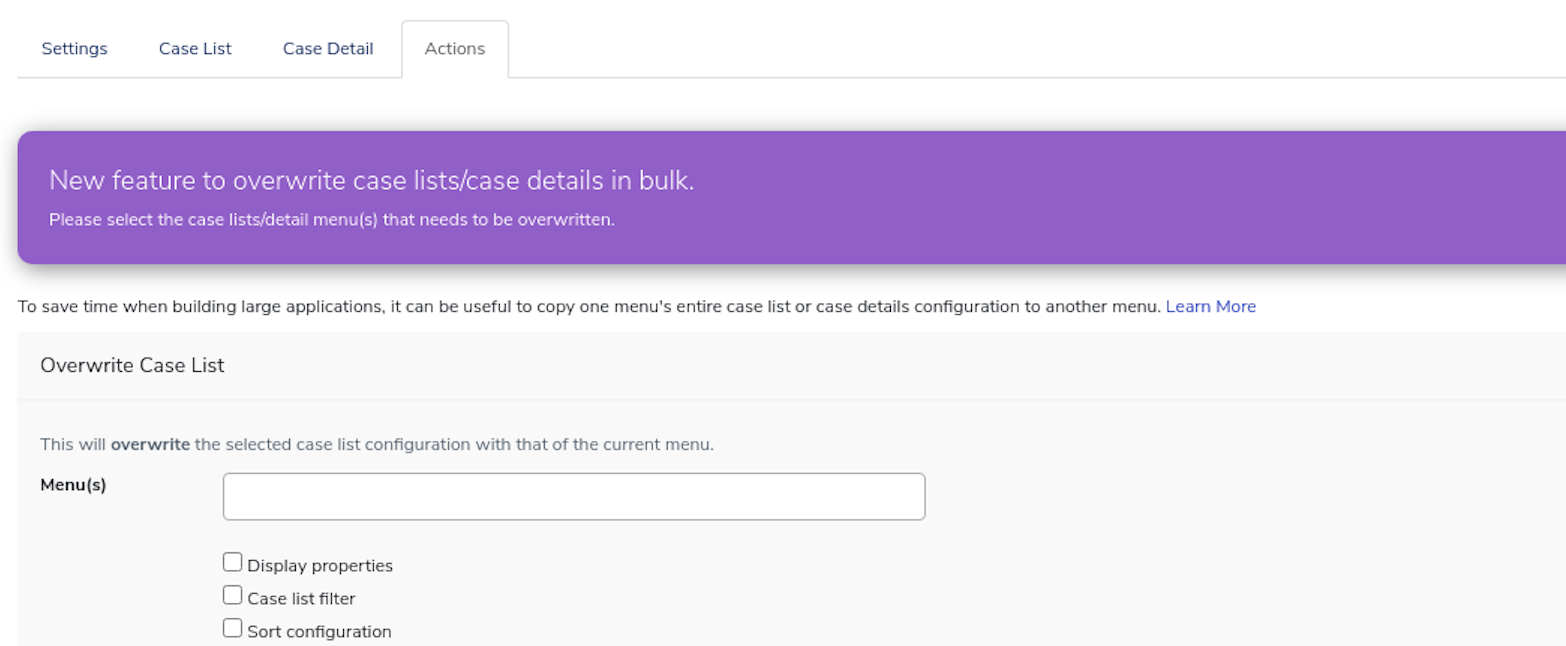 .png?version=1&modificationDate=1713848312562&cacheVersion=1&api=v2&width=760) Overwriting the Case List Configuration You can select one or more menus and then will copy the current menu's configuration to those menus. You also select which parts of the configuration you wish to copy. The default properties you can include are:
Note that Parent Child Selection cannot be copied using this feature. Overwriting the Case Detail ConfigurationAs with case list configuration, select one or more menus to copy the current menu's configuration to those menus. The entire case detail configuration is copied: display properties and sorting. |
Displaying History of Changes
In the case list screen it is often useful to display the history of a tracked value like patient weight or blood pressure.
...
| title | Click to expand. |
|---|
This can be done by following the incrementing a counter trick, but using a string concatenation instead of an increment:
"weight" is a number question in the form.
"weight_history" is a case property that tracks the history of weight values
"new_weight_history" is a hidden value that calculates the new weight history, including the current answer for "weight". This gets saved back to the case property "weight_history"
In the calculate condition for "new_weight_history", you use the concat function to add the answer to the weight question to the weight_history: concat(#case/weight_history, #form/weight, '-'). The final dash is a separator that ensures the weight history can be easily read.
Example
Icon
The output of this would be "55 - 56 - 58 - " and would continue to track the additions.
...
CommCare MobileWhen turned on, a link to your selected registration form will always appear in the case list: 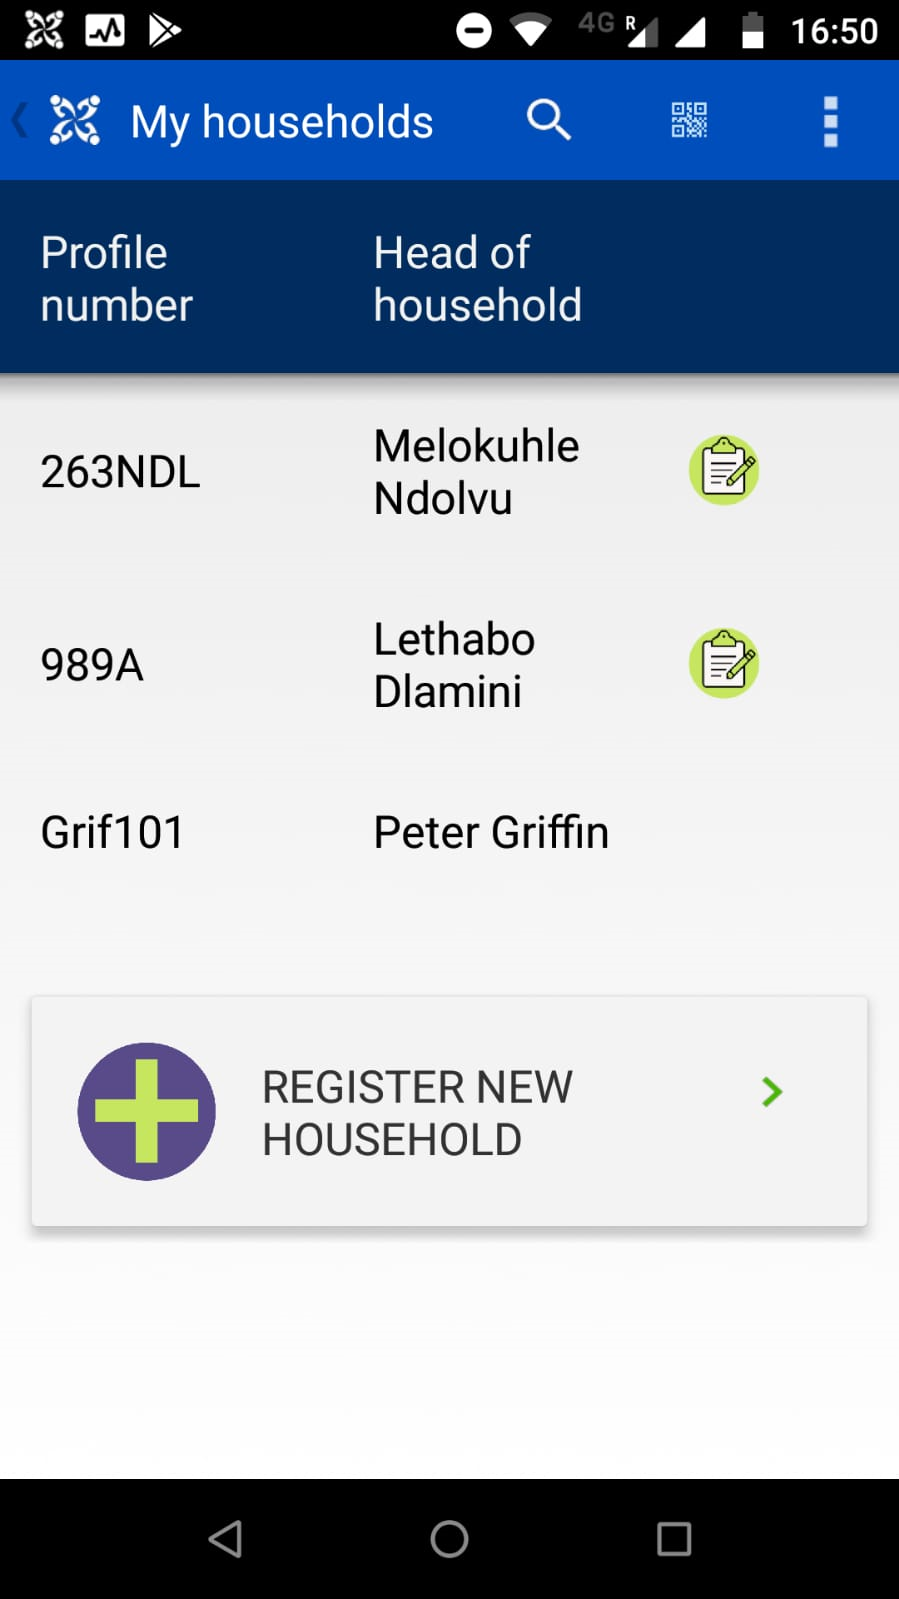 Even if you enter a search term, the option to jump directly to registration will show up at the bottom of the case list: 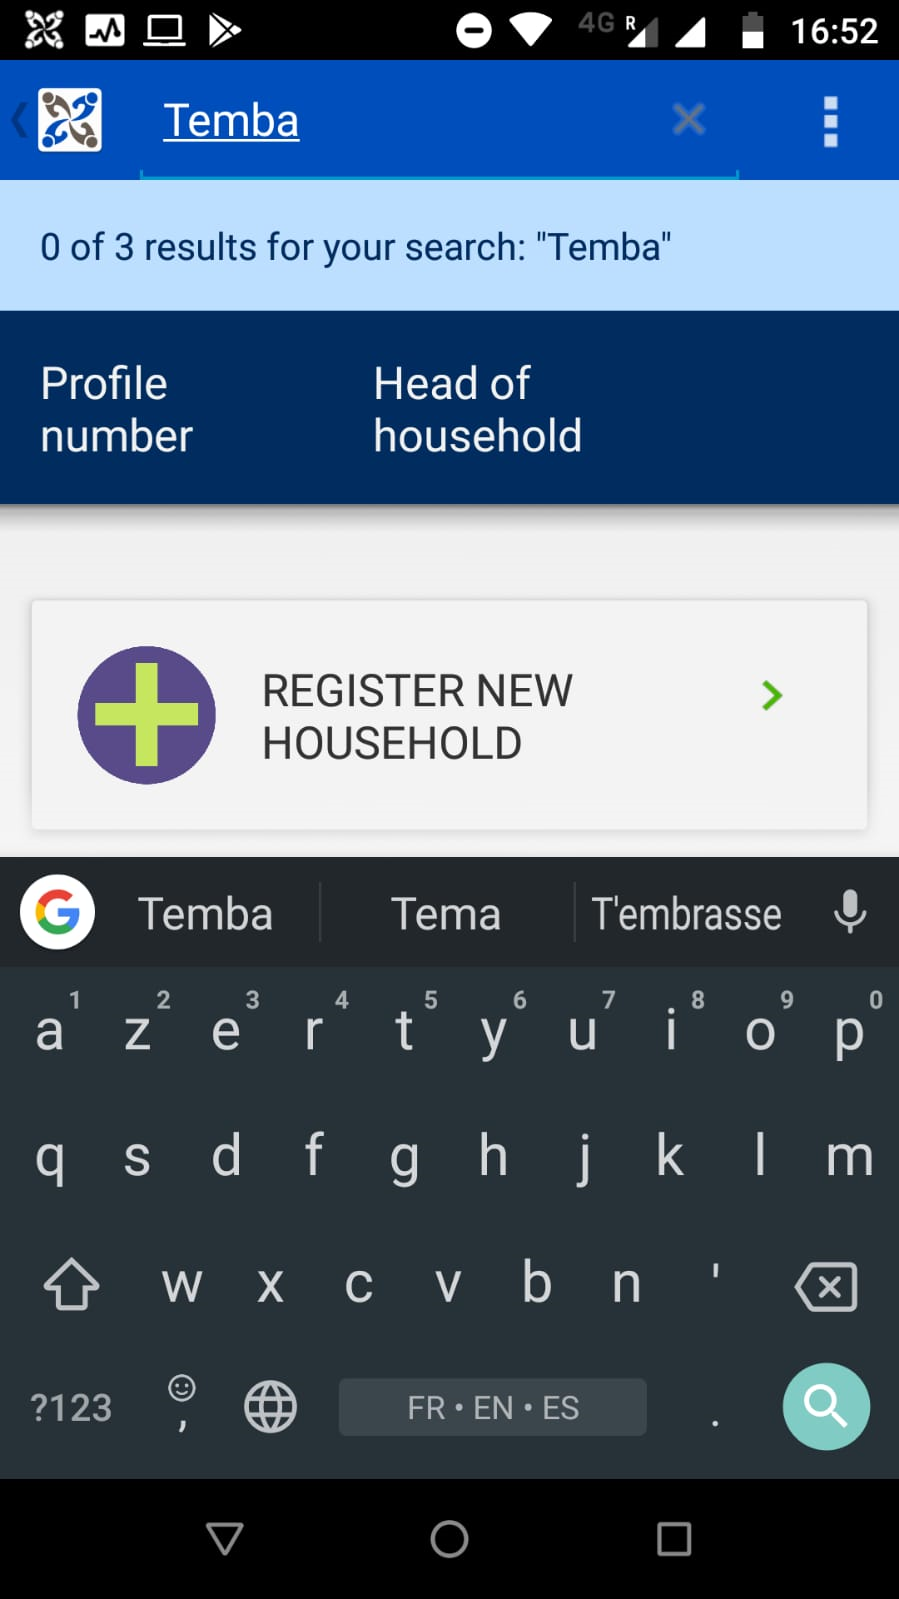 Configuration on CommCare HQFirstly, enable the "Register from Case List" Add-Ons from the application settings page, if its not yet enabled.
 Choose the menu you want to configure. 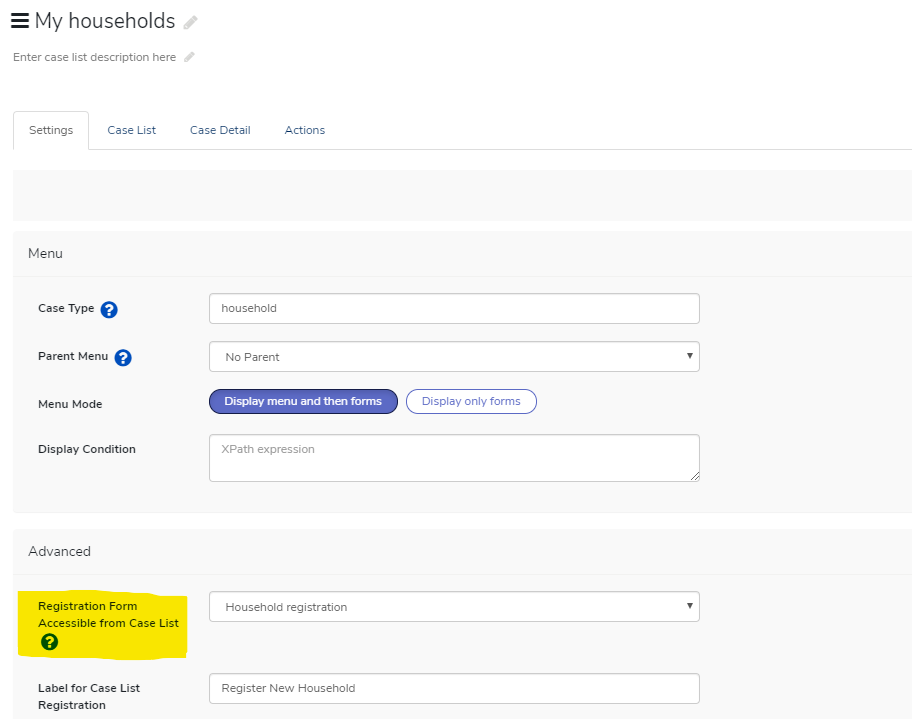 From the Registration Form Accessible from Case List dropdown, select the relevant registration form. Note: The form can be in any other menu in the same application, as long as it is the same case type. The form cannot be in the same menu as the menu that you are configuring with Registration from Case List. Example app setup with register from case list: 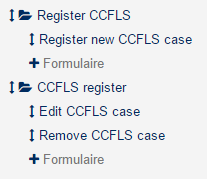 "Register new CCFLS case" is the form that is accessible from the case list of "CCFLS register". The menu filter on "Register CCFLS" is set to "false()" so that registration is only possible through the case list. The settings are set up in the case management tab of "CCFLS register".
Change the label, end of registration action and icon/audio if desired. 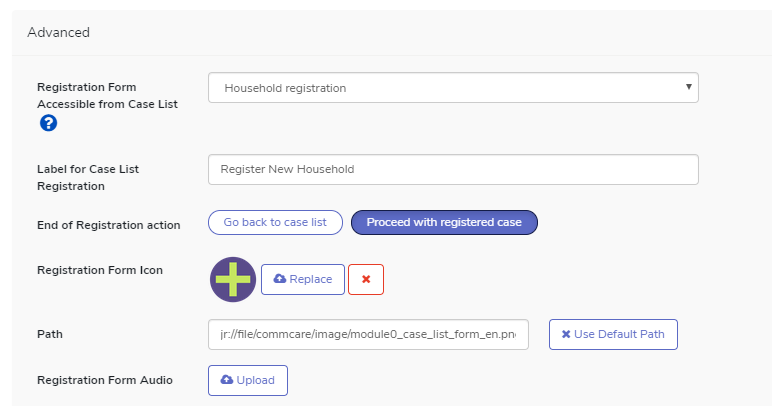 The label is what will show up on the mobile as the option to jump to the registration form. Limitations
|
Minimize Duplicates Method: Validating from a Label
Minimize data errors and duplicate case entries by setting up validations from a label in your CommCare application. This method utilizes labels, validation conditions, and session instance variables to set up a strict way of preventing users from registering duplicate cases. Please modify the instructions below to fit your specific needs.
Click to expand to learn more.
| Expand | ||
|---|---|---|
| ||
Configuration on CommCareHQImagine the following scenario:
If this scenario seems similar to your needs, please follow the instructions below:
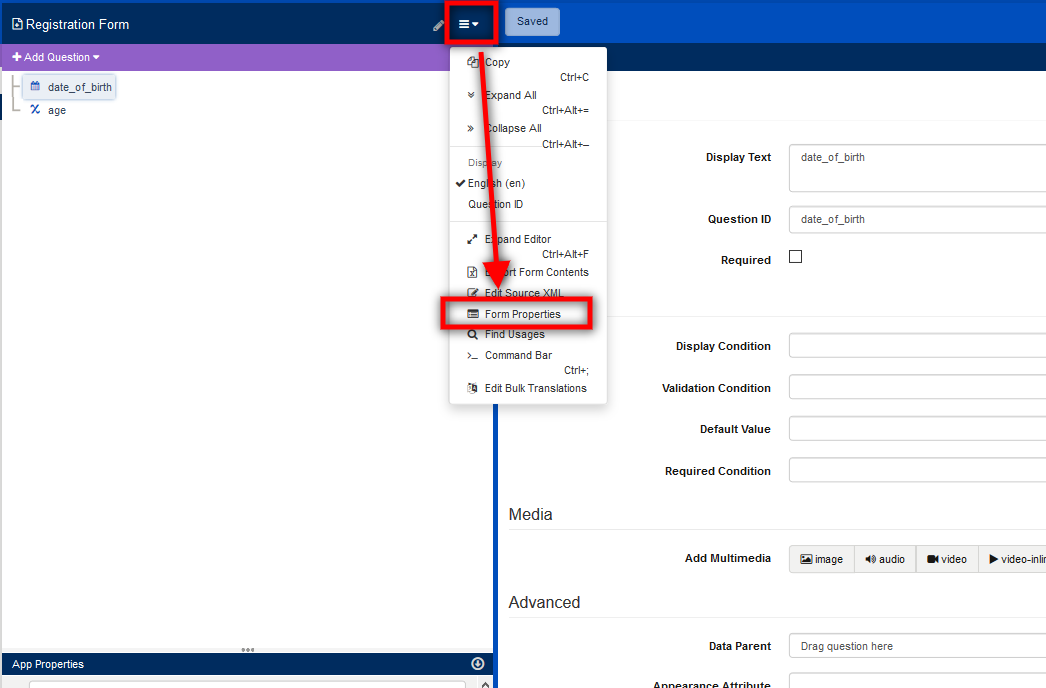
label field. a. In the label field, insert a validation condition similar to the following: b. Change each of the bold parts of the expression to match your application
Your label should look something like this: |
Calculations in the Case List and Details
In its basic form, the Case list and Case details definition pages only accept case properties of the module case type. However, there is an addon that allows the use of calculations in the case list/details, called Custom Calculations in Case List. In addition to calculations, the Add-Ons also opens the possibilities beyond the module case type, allowing access to any fixture available in the user’s restore file.
Click below to set this up.
| Expand | ||||||||||||||||||||||||||||||||||||||||||||
|---|---|---|---|---|---|---|---|---|---|---|---|---|---|---|---|---|---|---|---|---|---|---|---|---|---|---|---|---|---|---|---|---|---|---|---|---|---|---|---|---|---|---|---|---|
| ||||||||||||||||||||||||||||||||||||||||||||
Enabling the Add-onTo turn on this feature, proceed to the Application Settings (1) -> Add-Ons section (2) of the application: 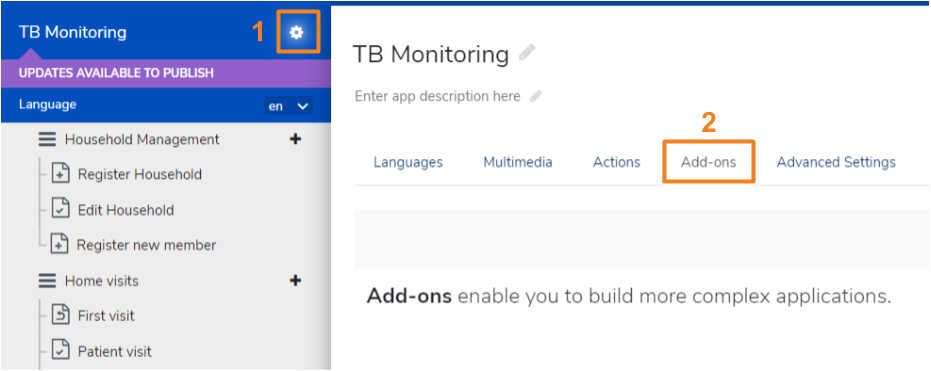 Next, select the button with three-lines in the upper right hand corner and choose “Calculations” (3): 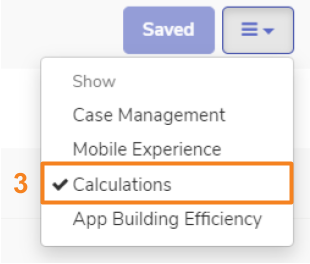 In the Calculation section, check the option “Custom Calculations in the Case List” Add-Ons (4) and hit save (5) to commit the changes. 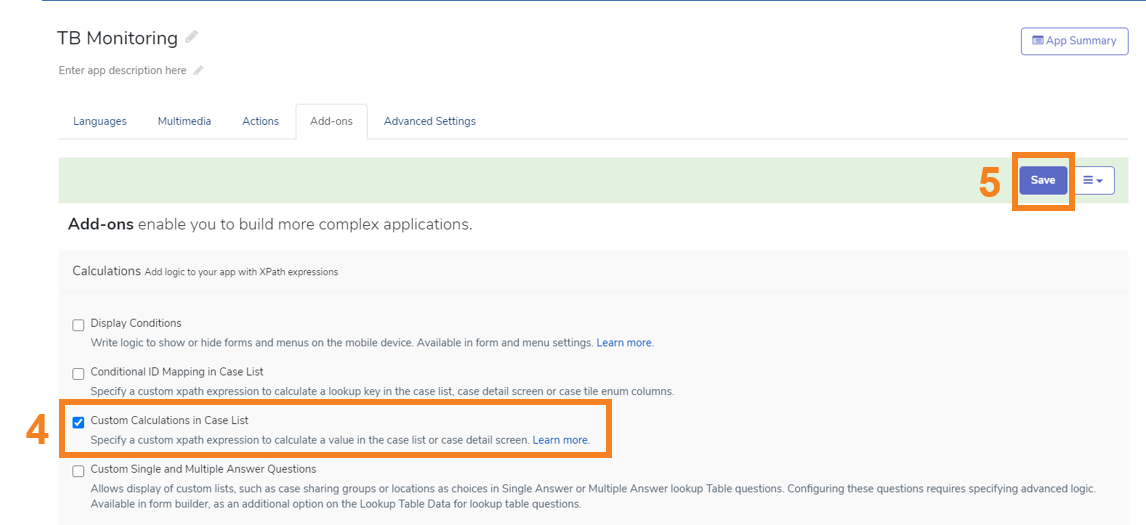 Using the FeatureOnce the Add-Ons has been enabled, a new option will appear in the Add Property dropdown list (1) in the Case List or Case Detail definition pages, selecting Calculated Property (2) will create a new field in which it’s possible to define an XPath expressions to perform calculations (3), including the use of case properties. 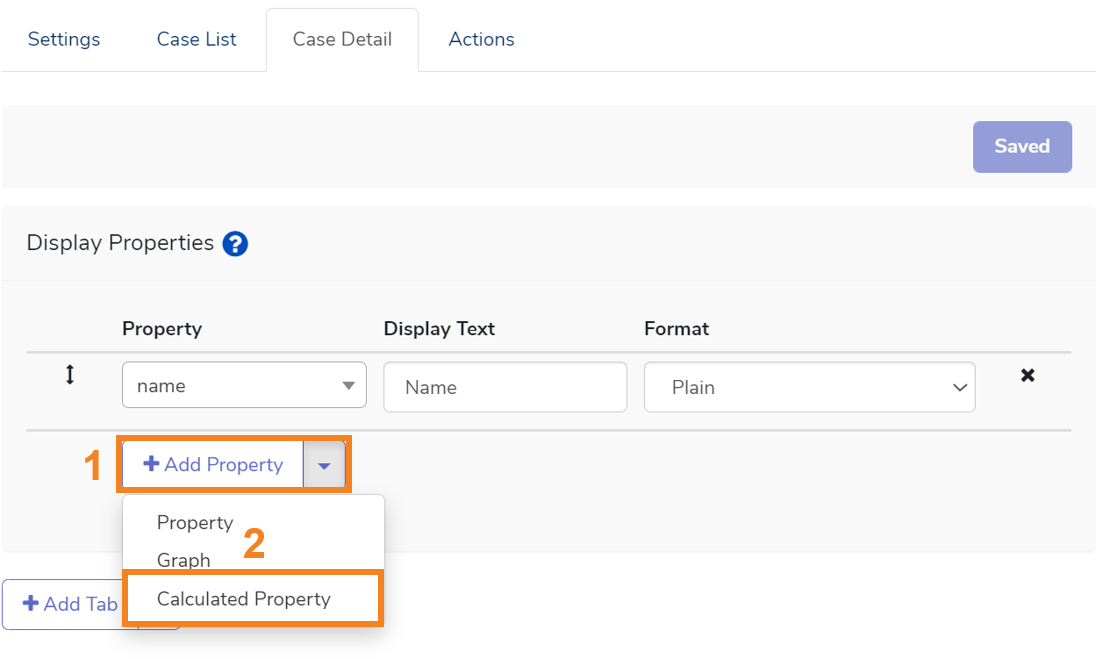  Writing expressionsCase properties and attributes in Calculated properties are evaluated the same way as Properties in Case List and Details, as long as they are within the scope of the current case being iterated over. For instance, if the selected property is age, Commcare will actually execute “current()/age”. For properties outside the scope, a full XPath query expression is required. See some examples below. Calculations within the scope
Calculations beyond the scope
|


Overwriting Case List and Case Detail Configuration
For applications that have many similar menus, it can be useful to copy one menu's entire case list or case details configuration to another menu.
This feature is behind an application Add-Ons . Click below to learn more.
| Expand | ||
|---|---|---|
| ||
To turn it on, visit your application's Settings page by clicking the gear next to the application's name: And then click the Add-Ons tab: This feature is an efficiency Add-Ons Using the Feature Caution: This action is irreversible. It is strongly recommended that you make a new version of your application before trying out this feature. In the event of an error, you can revert back to that version. Once the feature is enabled, visit the menu that you wish to copy and select the Actions tab to see the overwrite options. Overwriting the Case List Configuration You can select one or more menus and then will copy the current menu's configuration to those menus. You also select which parts of the configuration you wish to copy. The default properties you can include are:
Note that Parent Child Selection cannot be copied using this feature. Overwriting the Case Detail ConfigurationAs with case list configuration, select one or more menus to copy the current menu's configuration to those menus. The entire case detail configuration is copied: display properties and sorting. |