| Multiexcerpt include macro | ||||||||||
|---|---|---|---|---|---|---|---|---|---|---|
|
...
To manage larger data sets and questions to pull from, CommCareHQ allows you to define Lookup Tables that can be used in your forms for information that changes over the lifetime of your application, or is different for each user. Table of Contents:
...
| Table of Contents | ||||||||||||
|---|---|---|---|---|---|---|---|---|---|---|---|---|
|
CommCareHQ allows you to define Lookup Tables that can be used in your forms for information that changes over the lifetime of your application, or is different for each user. Here are some examples of potential functionality that can be added with lookup tables:
...
| Expand | ||
|---|---|---|
| ||
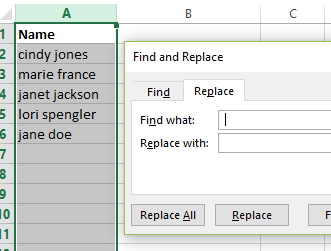
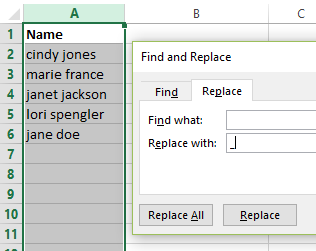
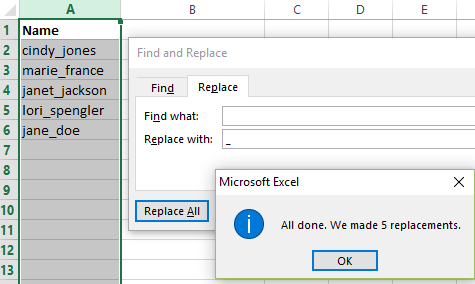
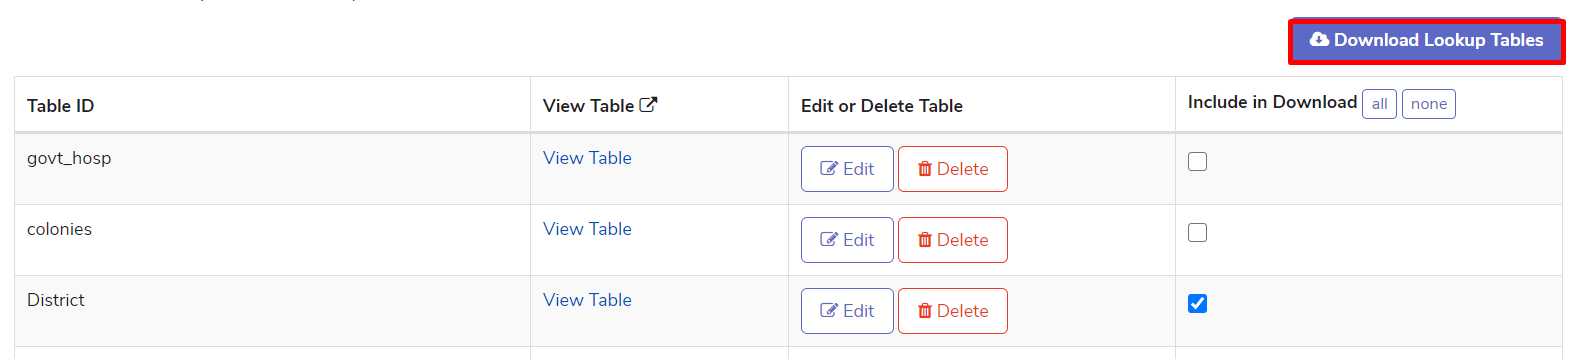
Managing large lookup tables efficiently Sometimes when creating Lookup Tables, you can receive large source files with values in different fonts, all caps etc. This page describes a few tricks on how to make values easily all lower case, how to replace spaces by underscores etc. Below are a set of Excel formulas, with a description of what it does and how to use it. Note: this tutorial assumes that you are using Excel in English. The names of the formulae are different in French. How to turn all your text entries to first-letter capital for each word (ex: First_name Last_name) =properUse: Converts words written in any format to words where the first letter is upper case and the rest is lower case. Example: CAPE TOWN > Cape Town How: Add a column next to the column where all the values are, then in the first cell of the new column add =proper(cell number) and click enter (for 'cell number' click on the cell with the all caps value). Drag the corner right little box from the cell down so that all values from the all caps column will be converted. When clicking on the new value, you'll notice that the value of the cell is still the formula. Select the first cell and then click ctrl+shift+down arrow (this will select all values in this column) and click ctrl+c to copy the selection. Then right click and choose 'paste values' under paste options. This eliminates the formula so that you are only left with the values you want (i.e., the text in the desired format). 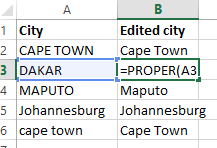 Note: For words that are already properly formatted (ex: Johannesburg in the example above), no change is applied. Note as well that "cape town" turns to Cape Town. How to quickly format all your text entries to all caps: =upper Use: Converts words written in any format to all caps. Example: Cape Town > CAPE TOWN How: Add a column next to the original words/text. Use the formula =UPPER(cell number) in the new column and click enter. Drag down the formula to replicate this for all your text. When clicking on the new value, you'll notice that the value of the cell is still the formula. Select the first cell and then click ctrl+shift+down arrow (this will select all values in this column) and click ctrl+c to copy the selection. Then right click and choose 'paste values' under paste options. This eliminates the formula so that you are only left with the values you want (i.e., the text in the desired format). 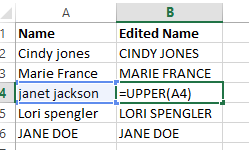 How to quickly format all your text entries to lower case: =lower Use: Converts words written in any format to all lower case. Example: Cindy Jones > cindy jones How: Add a column next to the original words/text. Use the formula =LOWER(cell number) in the new column and click enter. Drag down the formula to replicate this for all your text. When clicking on the new value, you'll notice that the value of the cell is still the formula. Select the first cell and then click ctrl+shift+down arrow (this will select all values in this column) and click ctrl+c to copy the selection. Then right click and choose 'paste values' under paste options. This eliminates the formula so that you are only left with the values you want (i.e., the text in the desired format). 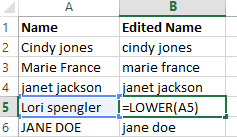 How to quickly delete unwanted spaces: =trim Use: For when you receive a list of names/places where there is a space before the first word or after the final word. Example " cindy jones " (notice the space before 'cindy' and after 'jones'. The TRIM function will yield "cindy jones" How: Add a column next to the original words/text. Use the formula =TRIM(cell number) in the new column and click enter. Drag down the formula to replicate this for all your text. When clicking on the new value, you'll notice that the value of the cell is still the formula. Select the first cell and then click ctrl+shift+down arrow (this will select all values in this column) and click ctrl+c to copy the selection. Then right click and choose 'paste values' under paste options. This eliminates the formula so that you are only left with the values you want (ie, the text in the desired format). Note: TRIM only deletes spaces before or at the end a full string of text. It will not eliminate common/accurate spaces such as the space between a first and last name. 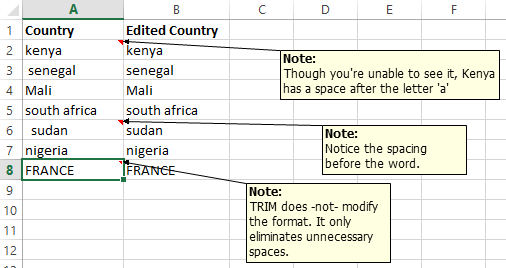 Combining the above formulas: (ex: to eliminate unnecessary spaces AND to format upper/lower case) =UPPER(TRIM(cell number)) or =LOWER(TRIM(cell number)) or =PROPER(TRIM(cell number)) Use: Do the steps above more quickly! How: Add a column next to the original words/text. Use the formula =UPPER(TRIM(cell number)) in the new column and click enter. Drag down the formula to replicate this for all your text. *the bolded UPPER can be modified to reflect what you actually want. When clicking on the new value, you'll notice that the value of the cell is still the formula. Select the first cell and then click ctrl+shift+down arrow (this will select all values in this column) and click ctrl+c to copy the selection. Then right click and choose 'paste values' under paste options. This eliminates the formula so that you are only left with the values you want (ie, the text in the desired format).  How to turn spaces into underscore (necessary for uploading your lookup tables into CommCare HQ) Use: It is recommended that before you upload your lookup table into CommCare HQ that you eliminate the spacing between the words. Example: marie france > marie_france How: (numbered steps correspond to the images below)
   How to quickly append text/numbers to the end a text: =CONCATENATE Use: Imagine that you have a list of districts and another list of villages. Some of the districts have the exact same name as the villages (Ex: District: Bambara, which contains a village also called Bambara). CommCare will require you to distinguish which of the "Bambara" is a village and which is a district. For this example, we will append "_vil" to the end of each village name. How: Create a column next to the one containing the words you want to append. Use =CONCATENATE(cell number, "what you want to append"). In this case, we appended _vil. When clicking on the new value in the column "Appended Village", you'll notice that the value of the cell is still the formula. Select the first cell and then click ctrl+shift+down arrow (this will select all values in this column) and click ctrl+c to copy the selection. Then right click and choose 'paste values' under paste options. This eliminates the formula so that you are only left with the values you want (ie, the text in the desired format). 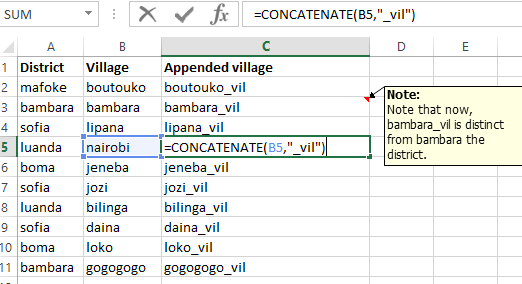 How to quickly eliminate duplicate entries from your Lookup list: Use: To link villages to districts, you need one row per village. But because multiple villages can belong to a single district, this means as a result that you will have several rows where your district is repeated. CommCare will require a separate list for districts and a separate one for villages. For that reason, you will want to eliminate all the duplicate districts from your Excel spreadsheet. How: (numbered steps correspond to the images below) 1.. Select the columns containing duplicate data. Click "Data" on the toolbar, then click "Remove Duplicates" 2.. Make sure that you select that your data has headers (if it does), and that you have selected the entire column. Click OK. 3.. You will see a message box with the number of duplicate values that have been removed and the number remaining. 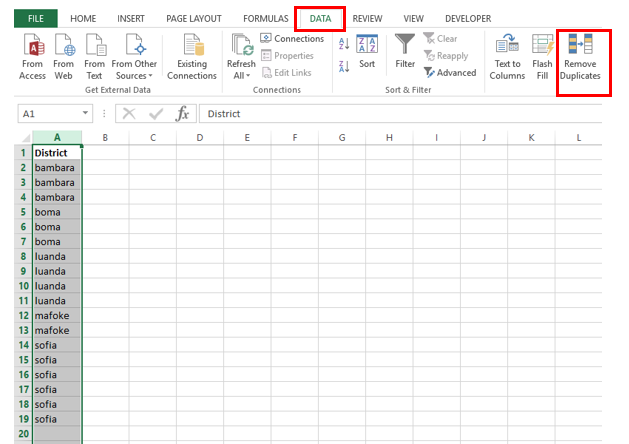 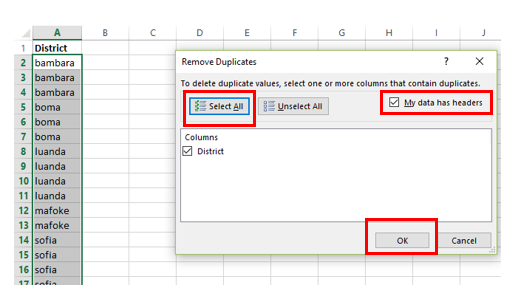 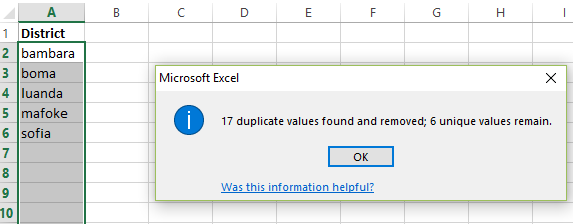 If you want to be able to see which duplicate values were removed
How to (very) quickly fill in a column with a value or a formula: If you want to quickly pull down a single value, you can double click (don’t drag) on the bottom right corner and the value will fill in bellow for all rows where there is information next to it. The RED X shows you were to double click.  AND the same thing can be done with Functions! But don't forget to copy and paste value once you've created a column of functions. 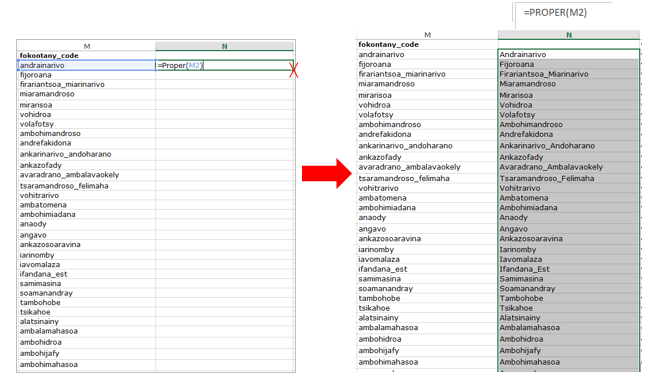 |
...
| Expand | ||||||||||||||||||||||||||||||||||||||||||||||||||||||||||||||||||||||||||||||||||||||||||||
|---|---|---|---|---|---|---|---|---|---|---|---|---|---|---|---|---|---|---|---|---|---|---|---|---|---|---|---|---|---|---|---|---|---|---|---|---|---|---|---|---|---|---|---|---|---|---|---|---|---|---|---|---|---|---|---|---|---|---|---|---|---|---|---|---|---|---|---|---|---|---|---|---|---|---|---|---|---|---|---|---|---|---|---|---|---|---|---|---|---|---|---|---|
| ||||||||||||||||||||||||||||||||||||||||||||||||||||||||||||||||||||||||||||||||||||||||||||
First setup the following two tables using the Creating and Updating Lookup Tables section. You can use whichever mobile workers or groups that you have in your project. state:
district:
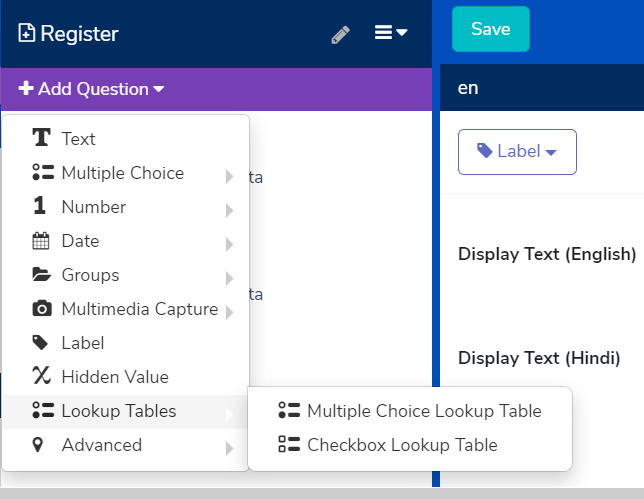
Our sample creates two tables (state and district). The district table has three fields (id, name and state_id). The state_id will be used to filter the list of districts based on the selected state. The following image shows our final setup. Create a Multiple Choice/Checkbox Question Based on a Lookup Table NOTE: Lookup tables referenced in Multiple Choice or Checkbox questions should not have values with spaces in them. This can cause data issues in your app. Please define the values in the lookup tables without spaces. To create a multiple choice or checkbox question based on a lookup table, first add the question to your form. 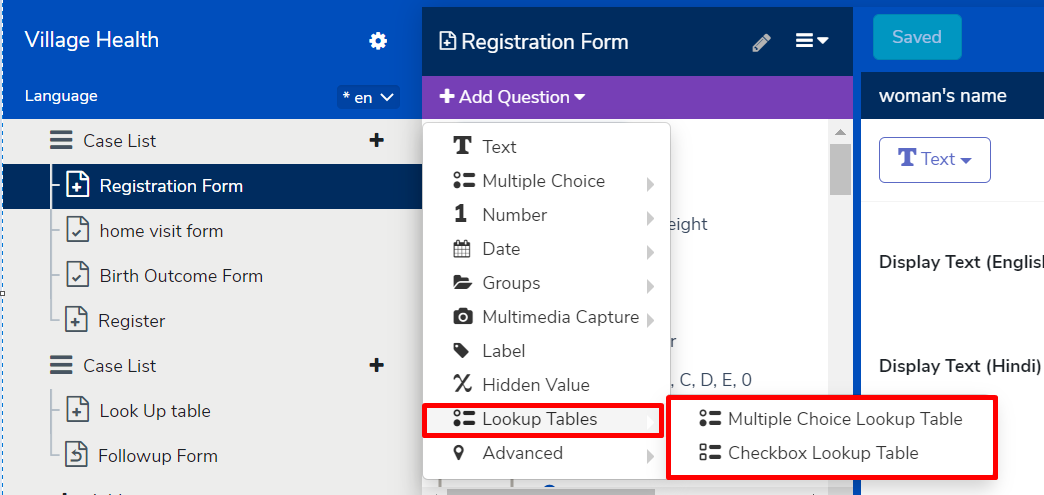 In our example, we'll add two multiple choice lookup table questions, "state" and "district". 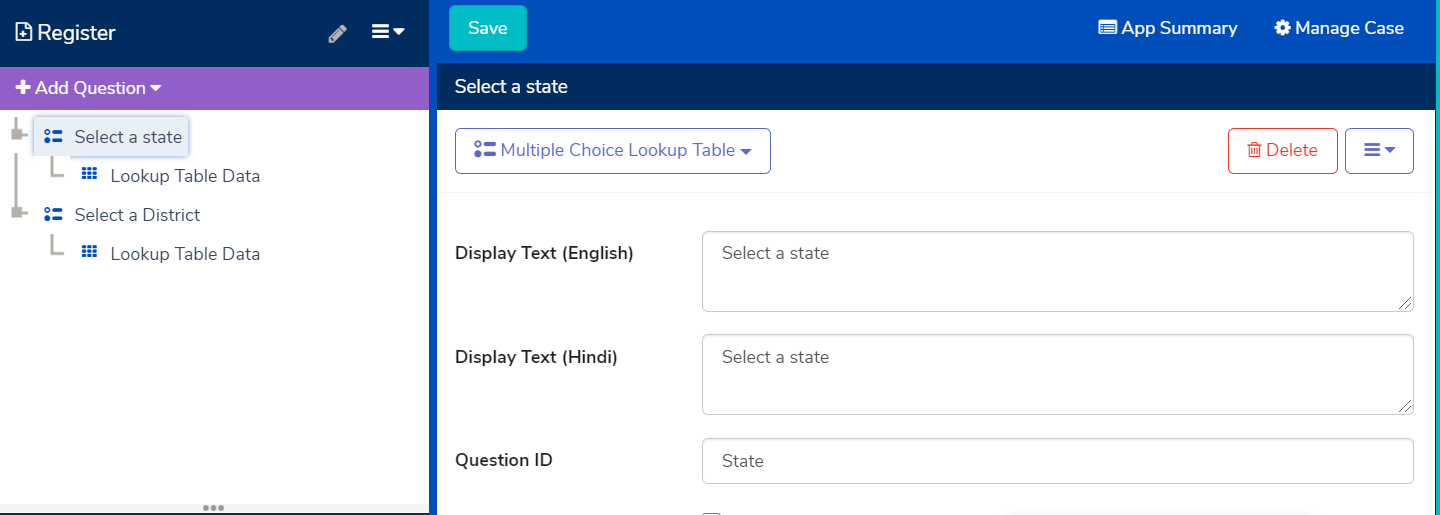 Now go to "Lookup Table Data" and select the correct lookup table and value and label fields. When inputting the value and labels an autocomplete widget will show you valid options for these fields. 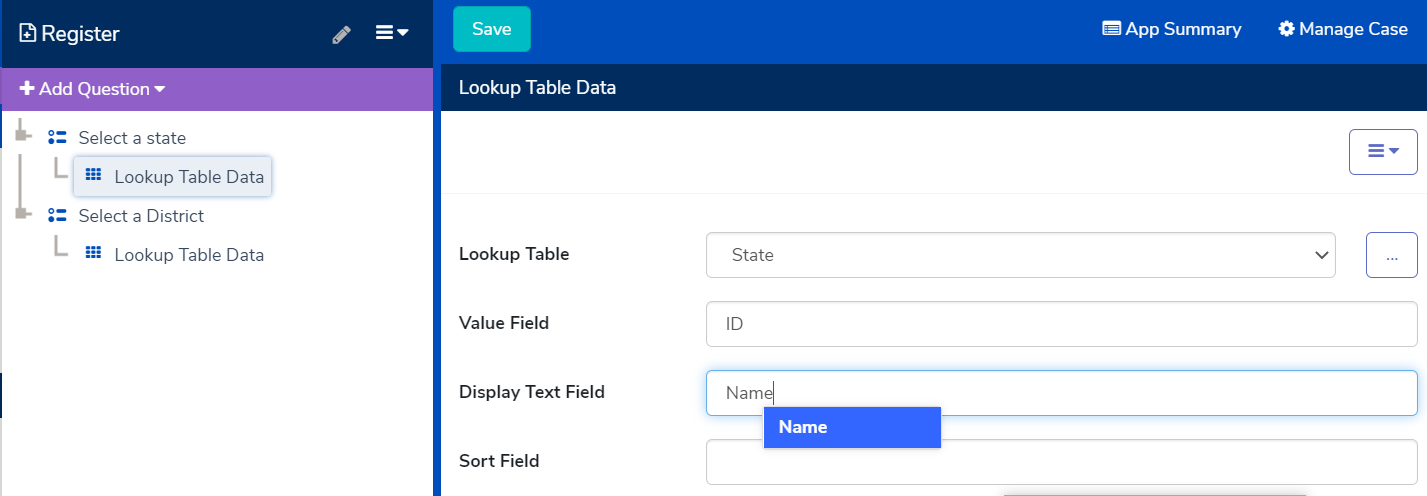 If you were to test this application, you'd see the first question displays a list of all states and the second question displays a list of all districts (irrespective of the selected state). To filter the district list, we need to add a filter condition to the choices. Filtering the Choices To filter the set of choices, you can use the 'Filter Option' under 'Lookup Table Data' (similar to the expressions used when defining Display Logic or Calculations in your form). In our example, we'll filter the District item list based on the selected state. Our district table contains a field called "state_id". The values in this match the value specified for the state question. The left option will show an autocomplete widget to help you pick a lookup table attribute and the right option will allow you to drag a question from the question tree. 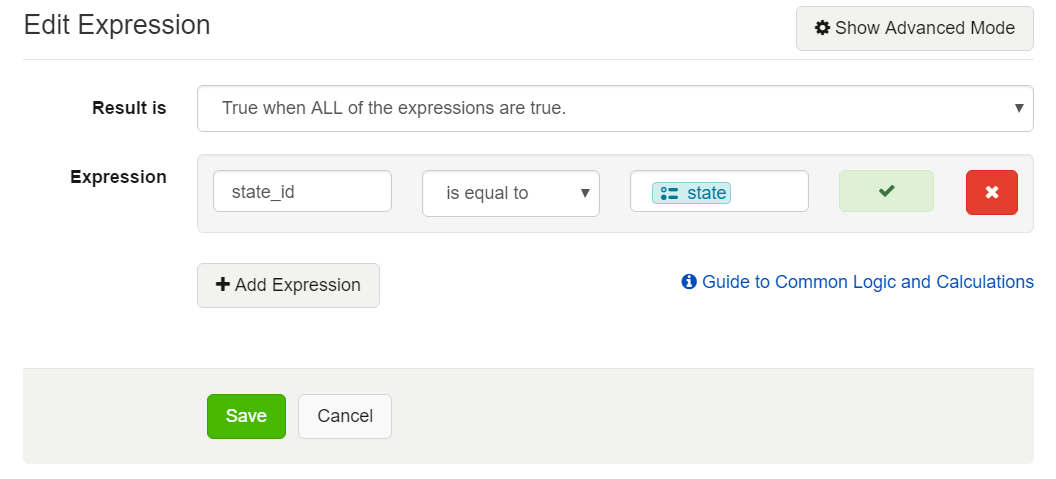 Loading a lookup table value into a hidden value instead of a multiple choice/checkbox question Sometimes you'll want to pull information from a lookup table into a hidden value. For example, from the example above, you want to save another case property called "project_name" and after the user selects a district, you already know which project it falls under. You create a hidden value question under the district question and name it "project_name". Then you create the following lookup table: project:
In the hidden value you'll enter the following calculation: instance('item-list:project')/project_list/project[id = /data/district ]/project_name. Depending on what the user chooses for district, the value for "project_name" will be either 'nutrition' or 'agriculture'. From the formula, the first 3 'project' refers to the lookup table name. 'id' is the value from the column in the lookup table that is matched with the question 'district', which has '/data/district' path in the form. The last part of the formula is 'project_name' and will be the value taken from the same named lookup table column and loaded into the hidden value. How to enter your own value using an 'other' option There might be times where you want to give the option to enter a location or value that might not be in the lookup table. You can do so by adding an 'other' option to your district table and a text question to your form that will only be displayed when the 'other' option is selected. The following steps will show you how to do so. Using the example above, we want to allow the user to enter a district that is not in the lookup table. To do so, you can add an ‘other’ field to the district lookup table:
You then proceed to create the form like you did above: 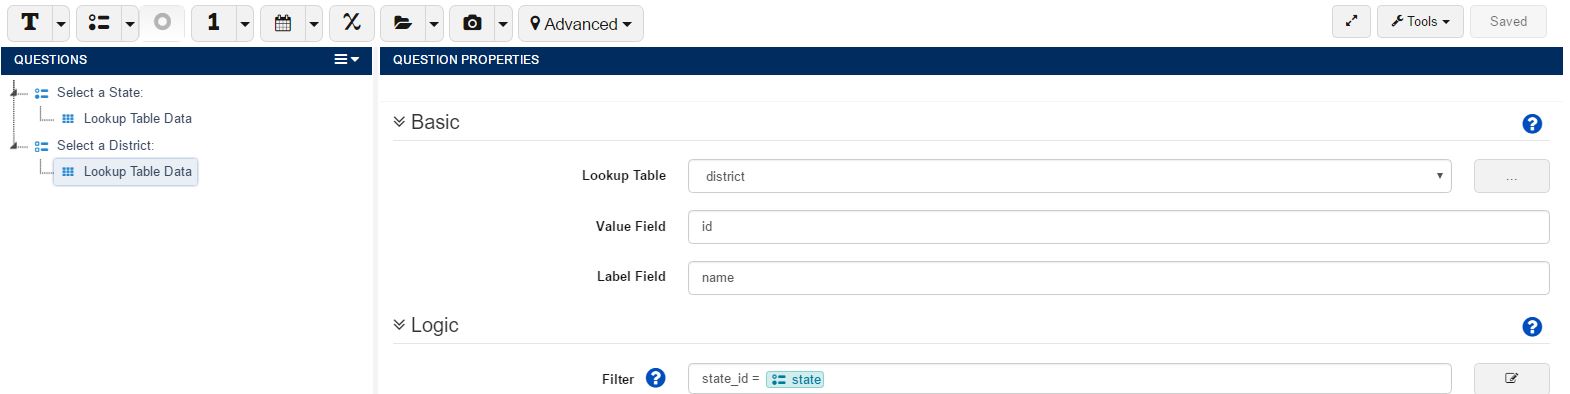 Once the locations are set up, you need to add another filter to the lookup table question in the form. This filter will be based on the district ID, so the first field should be set to ‘id’. The second field should be set to ‘is equal’. And the third field should be set to ‘other’. We also want this option to occur only when ‘other’ is selected, so we also need to change the ‘Result is’ field to be ‘True when ANY of the expressions are true.” Be sure to save the expression once you are done!  After saving the new expression and returning to the question properties page, you should see the full expression:  Now you just need to add another text question to the form that will be displayed only when ‘other’ is selected: 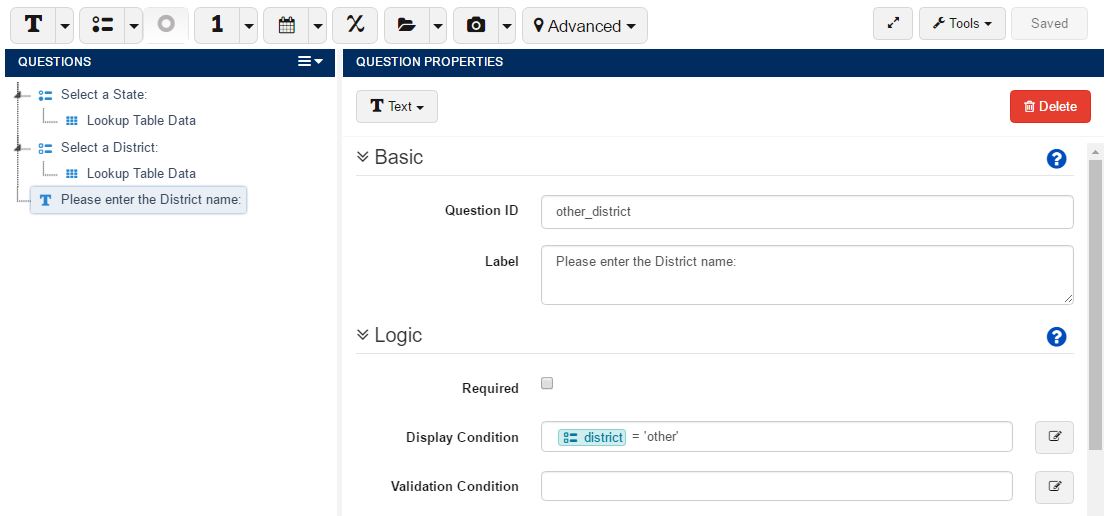 Now when your users select ‘other' for the district, they will be able to proceed to another question that will allow them to enter the district name. Testing an application with lookup tables In order to test the filtered choices and other logic works in the application, you must sign on as a mobile user and submit 'real' data to the server. If you see an error when opening the form that states "Could not find an appropriate fixture for src: jr://fixture/item-list:table_name" you have not properly setup your lookup tables.
If you run into issues testing your app with lookup tables, try to Clear user data. After you sync your phone if the lookup table still is not working, you may need to clear user data and log-in again. To do this, go to the login screen and click on Settings. After the Settings screen shows up, click the menu button, and select the first option, "Clear User Data." This will clear the username and force you to re-enter login credentials. Once you log in again, the new or edited table should be accessible to your user. Training an application with lookup tables
Factors contributing to form's performance using LookUp Table : In many cases, your Lookup table may scale up to a point where it starts to make your form inefficient for user to use. Lookup tables tend to deteriorate the user experience in such scenarios.
|
...
| Expand | ||||||||||||||||||||||||||||||||||||||||||||||
|---|---|---|---|---|---|---|---|---|---|---|---|---|---|---|---|---|---|---|---|---|---|---|---|---|---|---|---|---|---|---|---|---|---|---|---|---|---|---|---|---|---|---|---|---|---|---|
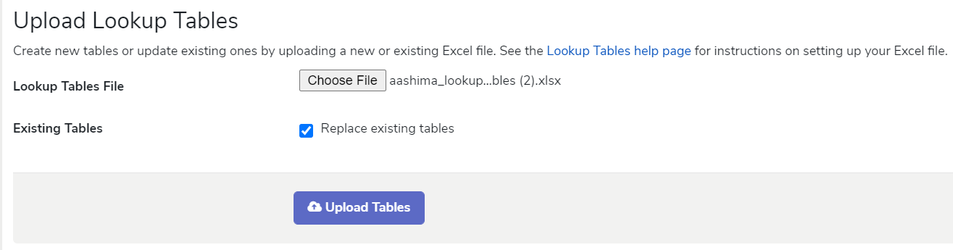
Defining a Lookup Table that Support Multiple Languages Please review the Creating and Updating Lookup Tables section to understand the basics of defining lookup tables. Unfortunately, the current interface cannot be used to completely define a table that supports multiple languages. Instead, we can upload an Excel document that sets up the table for us.
Note: I've set this table up so that its visible to all users (for simplicity). 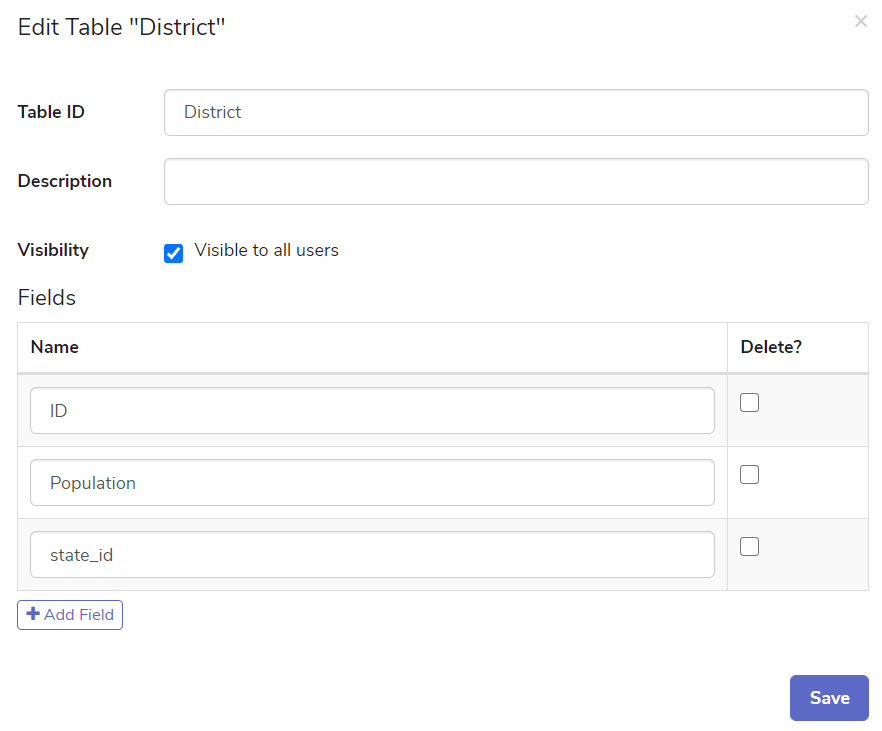
types sheet to identify which columns will have multiple languages. This is done by adding an extra property on the field that will indicate the language. This is highlighted in Red below.
state sheet to add the list of states with each language. We'll also need to modify this sheet's columns to include the additional language information. You will need to add columns for each language supported. The example below includes two languages, but you can add additional columns titled name: lang X and field: name X for more languages. In the lang column, specify the language code used in CommCareHQ for the language. You can find this by reviewing https://dimagi.atlassian.net/wiki/x/njTKfw. In this example, I've used English and Hindi. (Note: For new rows, you can ignore the UID and Delete(Y/N) columns).
Using Multiple Languages with Multiple Choice/Checkbox Questions
lang-code and label text that matches the language code for each language. We'll also set a Display Condition of 1=2 on this to ensure that it doesn't appear in the form. This label will be used to determine which language to display, based on what language is chosen. 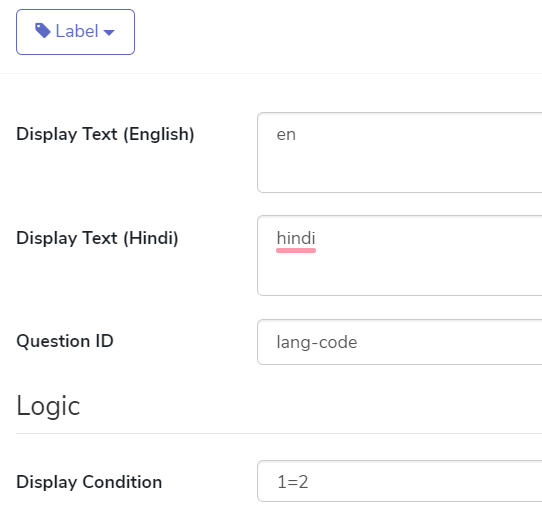
a. Set the lookup table to the lookup table you uploaded (ex. state) b. Set the value field to the column in your table you want to store (ex. id) c. Set the display text field to the following: name[@lang = jr:itext('lang-code-label')] . You can replace name with the column that contains multiple languages. 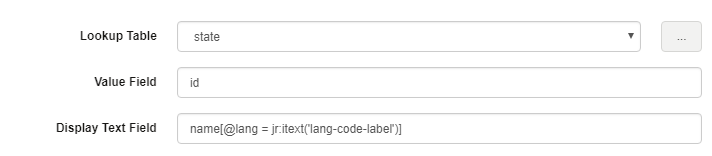
Testing an application with lookup tables In order to test the filtered choices and other logic works in the application, you must sign on as a mobile user and submit 'real' data to the server. If you see an error when opening the form that states "Could not find an appropriate fixture for src: jr://fixture/item-list:table_name" you have not properly setup your lookup tables (make sure you did tap the blue button in the app menu "sync with server" before going into the form as this can give the same error message. When you sync, the updated lookup table(s) will be downloaded to your device).
If you run into issues testing your app with lookup tables, try to clear user data. After you sync your phone if the lookup table still is not working, you may need to clear user data and log-in again. To do this, go to the login screen and click on Settings. After the Settings screen shows up, click the menu button, and select the first option, "Clear User Data." This will clear the username and force you to re-enter login credentials. Once you log in again, the new or edited table should be accessible to your user. Training an application with lookup tables
|
...